How to choose statement walls that elevate your entire space
Posted on Sat, 4 Oct 2025 by Guest
When it comes to creating a space that truly reflects your style, most people think of furniture, lighting, or home flooring as the main design decisions. While these elements are important, walls are often the unsung heroes of interior design, and the right statement wall can completely transform your home. A statement wall, also known as a feature wall, is your opportunity to inject personality, colour, and texture into a room without overwhelming the entire space.
From bold colours to textured panels, the right choice can add depth, balance, and even change how big or small a room feels. But choosing one that elevates your home rather than clashes with it requires a little thought and planning.
Understanding the purpose of a statement wall
Before you start browsing paint swatches or wallpaper samples, ask yourself what you want your statement wall to achieve. Is it meant to bring warmth to a living area? Add drama to a bedroom? Highlight a unique architectural feature?
A well-chosen statement wall can:
- Draw the eye to a focal point in the room
- Enhance the existing colour scheme
- Create a sense of depth and dimension
- Reflect your personal style without overpowering the space
The clearer your goal, the easier it will be to narrow down your options.
Colour as a statement
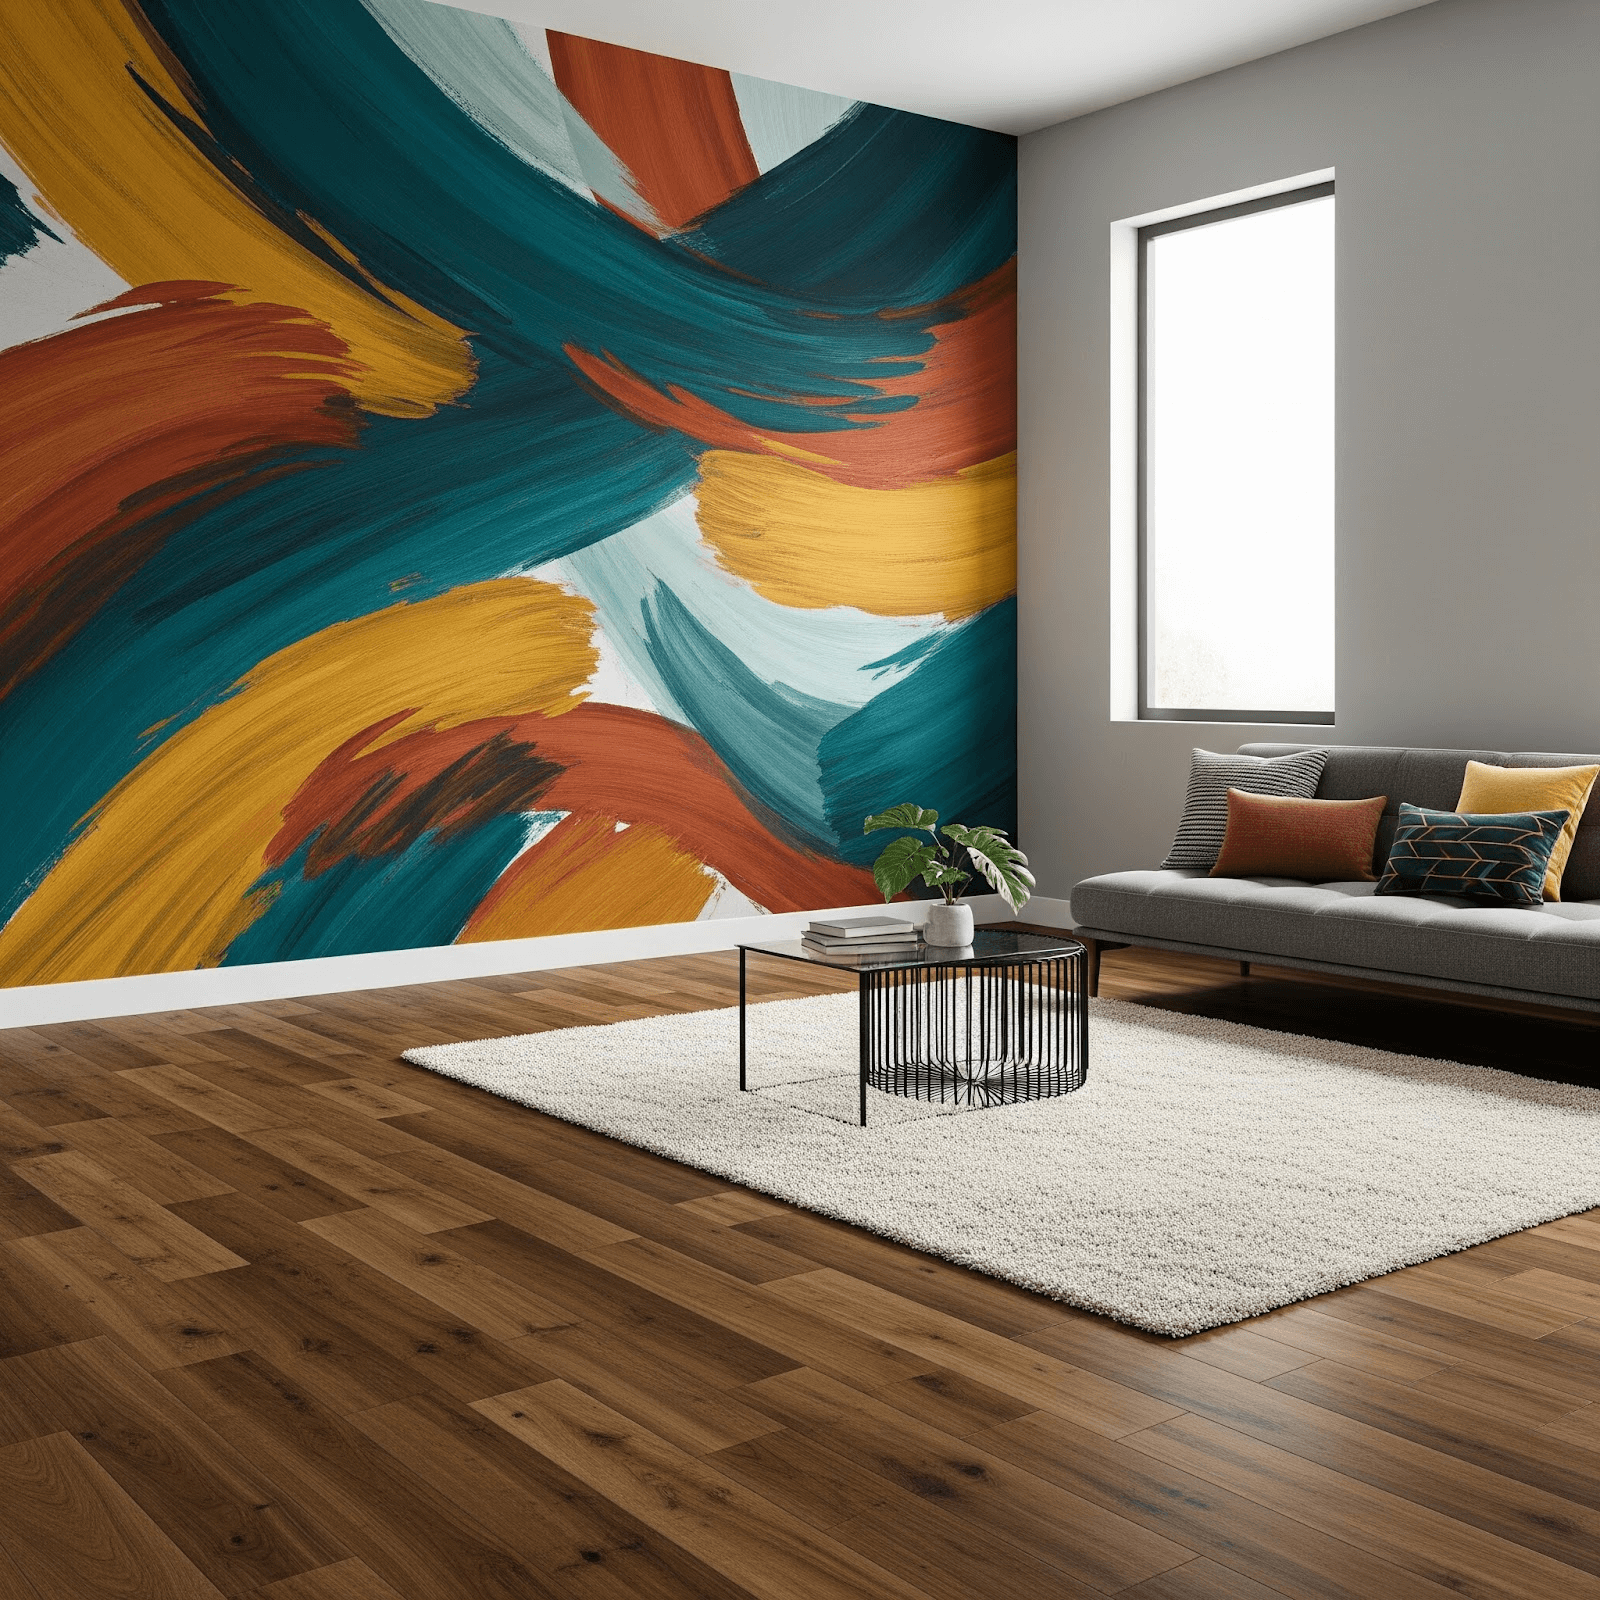
One of the simplest and most affordable ways to create a statement wall is with paint. Bold, saturated colours can add drama and depth, while softer shades bring a sense of calm and relaxation. The key is to select a colour that complements your existing décor rather than competes with it.
If your home flooring features warm timber tones (whether natural hardwood or Luxury Vinyl Plank (LVP), rich earthy hues like terracotta, olive green, or deep gold can create a cohesive and inviting atmosphere. LVP is particularly versatile, as it comes in a wide variety of shades and finishes that mimic everything from rustic timber to sleek modern surfaces, giving you plenty of flexibility when choosing wall colours. For lighter flooring styles, including pale oak or grey-toned LVP, cooler shades such as navy, charcoal, or teal can provide contrast while keeping the design balanced and intentional.
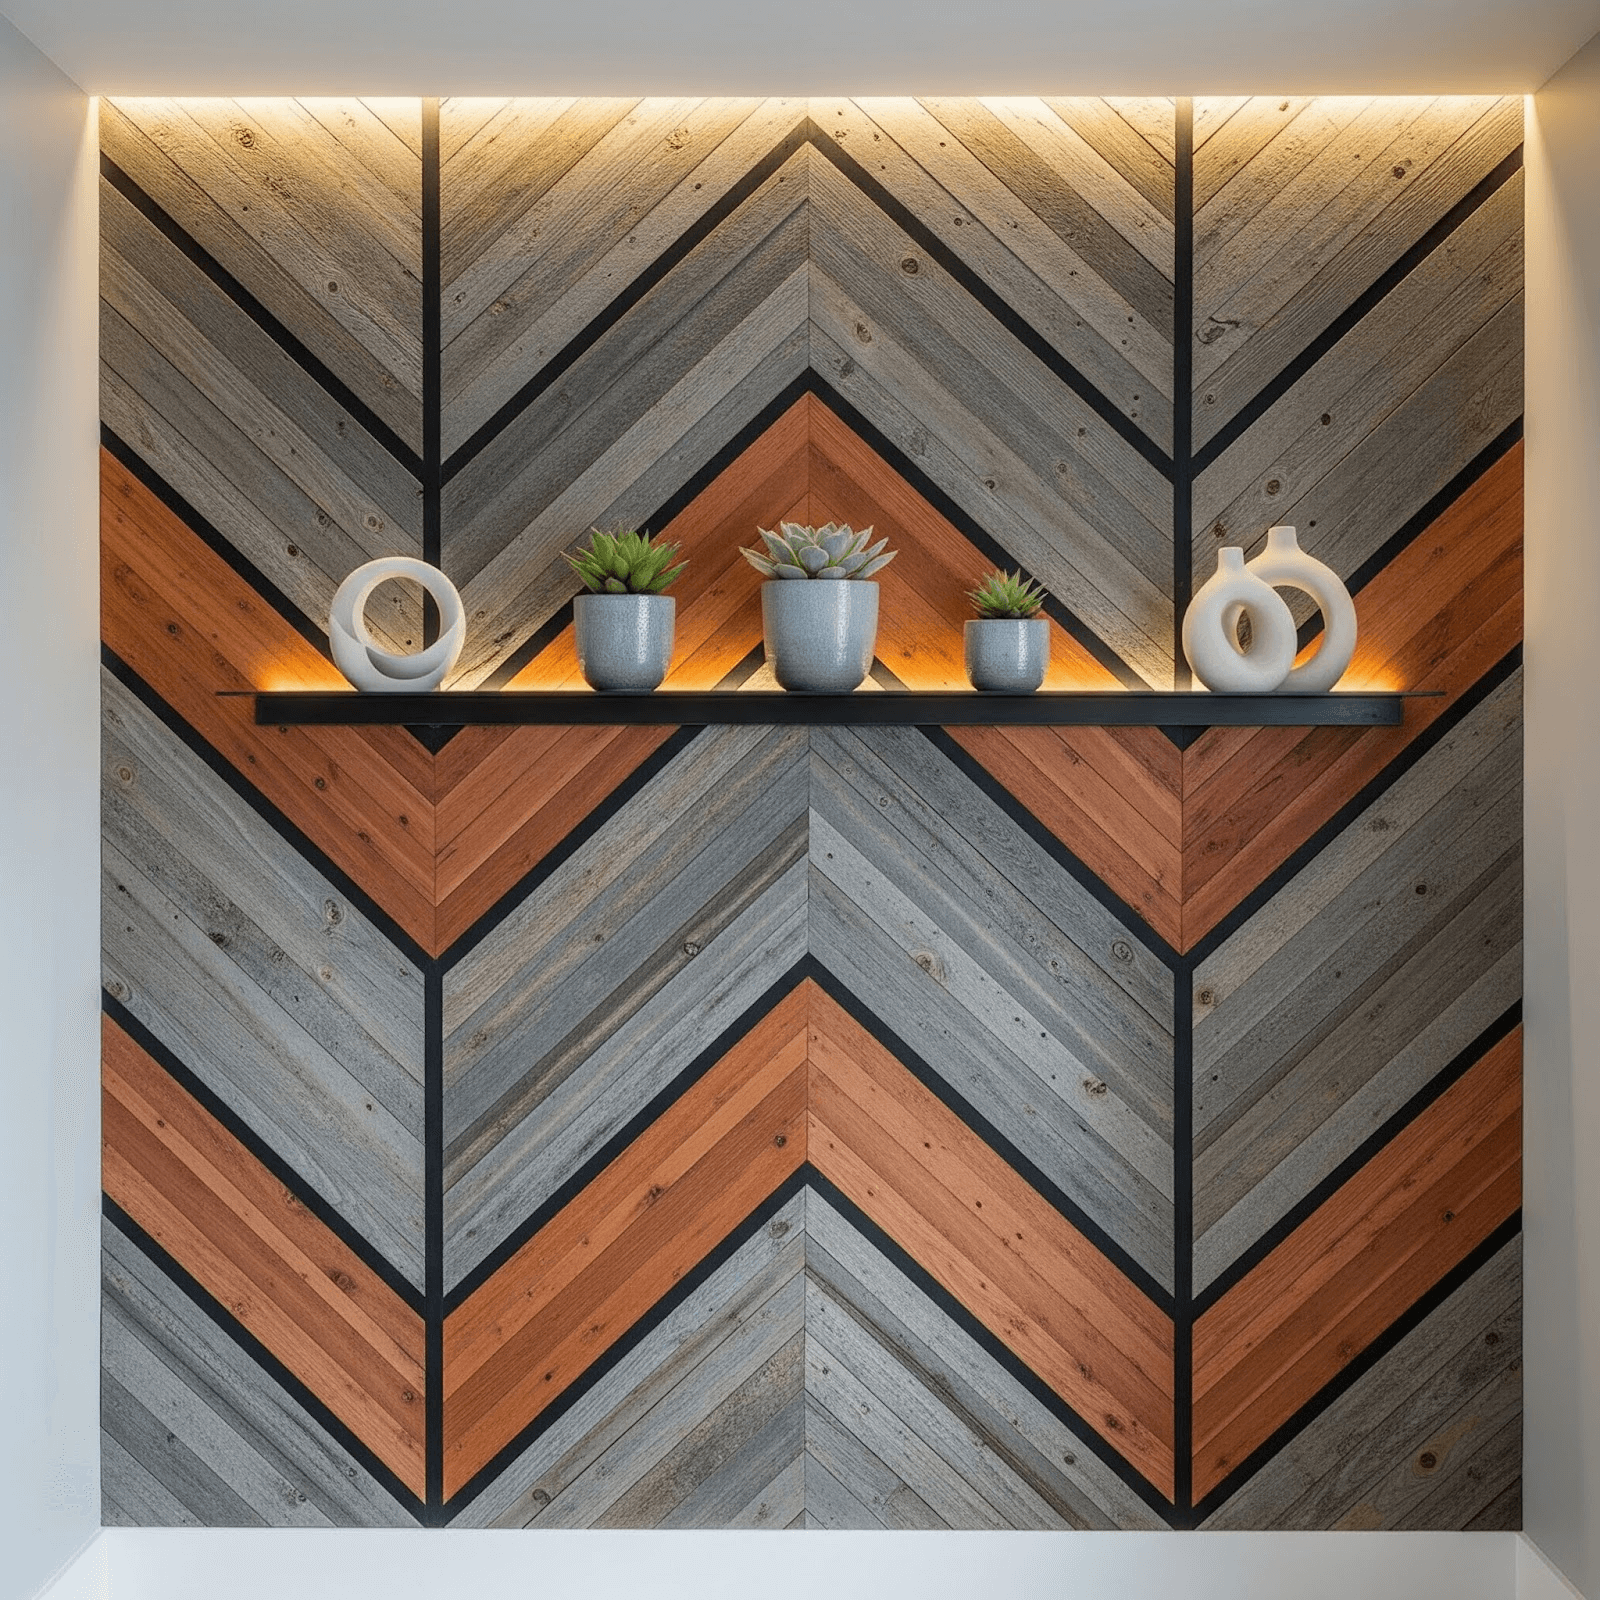
Textures and finishes
When creating a feature wall, colour is only part of the story, texture can be just as powerful. By introducing tactile surfaces, you instantly add depth, character, and personality to a room. Natural finishes such as timber, stone, or brick lend warmth and authenticity, while modern options like 3D wall panels, polished concrete, or textured wallpaper bring sophistication and impact. T
he right finishes don’t just enhance the wall itself; they also complement your furniture, lighting, and flooring to create a cohesive look. Textures can even shift the mood of a space – earthy, organic surfaces encourage a cosy, welcoming feel, whereas smooth and sleek finishes evoke a contemporary, open atmosphere. By experimenting thoughtfully with different textures, you can transform a flat wall into a striking focal point that elevates the overall style and ambience of your home.
Popular texture options
- Wallpaper with patterns, metallics, or botanical prints for a bold visual hit
- Timber panelling for warmth and character
- Stone cladding to add natural texture and depth
- 3D wall panels for a modern, architectural feel
Mixing textures with colour can create even more interest. For example, a navy-painted timber panel wall in a dining room can feel both sophisticated and cosy.
Using patterns effectively
Patterns can instantly energise a space, but they need to be handled with care. Large-scale geometric designs can make a strong statement in a contemporary home, while delicate florals or damask prints might suit a more traditional setting.
To keep things balanced, limit bold patterns to one wall and pair them with simpler, solid-coloured furnishings and accessories. This will prevent the space from feeling too busy.
Lighting your statement wall
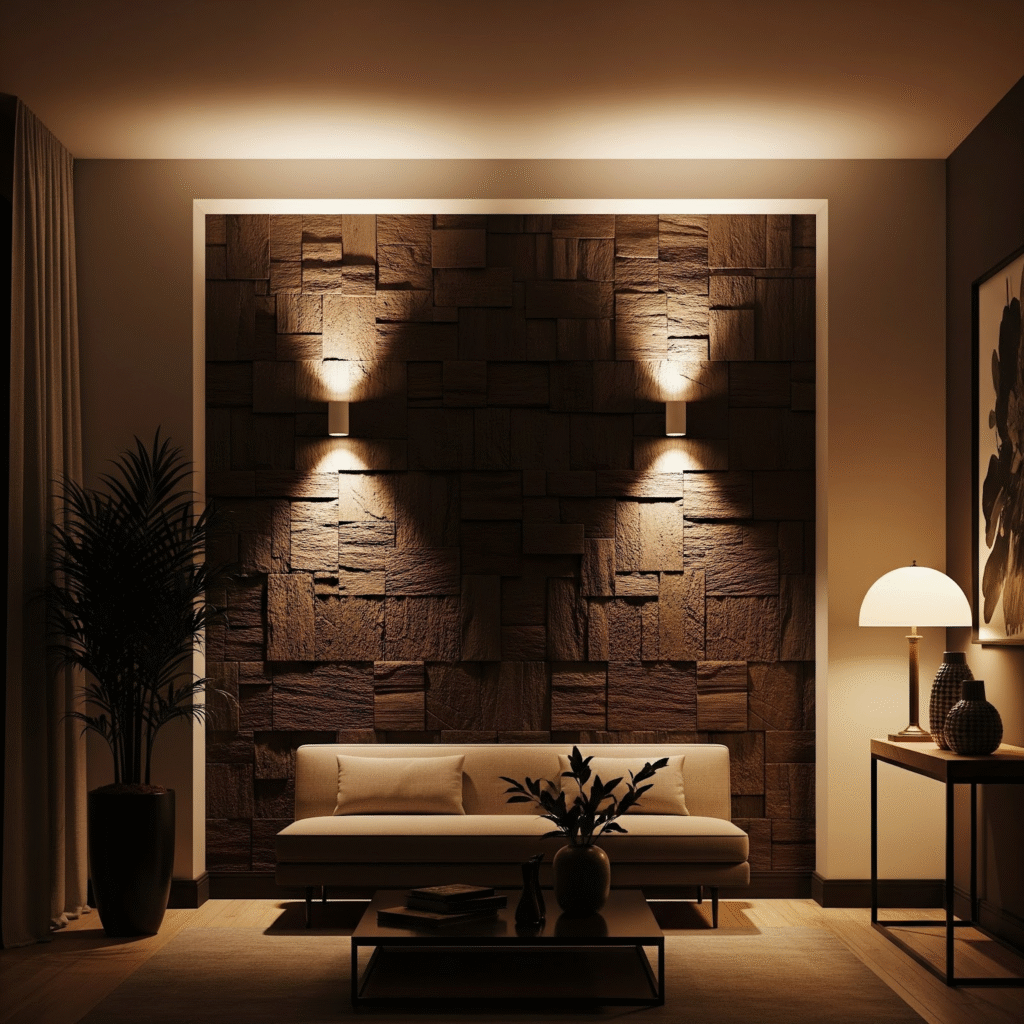
The way you light a statement wall can dramatically influence its impact. Spotlights, wall sconces, or even LED strip lighting can help highlight texture and colour, especially in the evening.
For example, stone cladding takes on new life when lit from above, with shadows enhancing its texture. Similarly, a wallpapered wall can pop under soft, diffused lighting that draws attention to its patterns.
Coordinating with the rest of the room
A statement wall should feel like part of the overall design, not an isolated feature. Pull colours or textures from the wall into other elements of the room, such as cushions, artwork, or rugs. This creates visual harmony and ensures the wall complements rather than dominates the space.
It is also important to think about proportion. If your statement wall is bold and colourful, balance it with more neutral tones in the rest of the room. Conversely, if the wall is more understated, you can afford to use bolder accents elsewhere.
Making your statement wall work for your home
Choosing the right statement wall is all about balance, cohesion, and purpose. Whether you opt for bold colour, rich texture, or a striking pattern, the key is to ensure it complements your home flooring, furnishings, and overall style. Done well, a statement wall does not just change how a room looks, it changes how it feels. That is the true power of thoughtful interior design.


Caring for Your Custom Window Treatments: Tips for Long-Lasting Elegance and Functionality
Posted on Wed, 22 Jan 2025 by Guest

Custom window treatments, including motorized shades, blinds, and drapes, are more than just functional – they’re a statement of style and convenience. If you’ve chosen window treatments NYC to elevate your space, keeping them pristine and operating smoothly requires consistent maintenance and smart usage. Here are some practical and fun tips to ensure your custom shades remain as stunning and functional as the day you installed them.
1. Start with Regular Cleaning Routines
Dust and dirt can accumulate over time, affecting the appearance and performance of your custom window treatments. A regular cleaning schedule keeps them in top shape and prevents wear and tear.
How to Clean Different Types of Window Treatments:
- Motorized Shades: Use a microfiber cloth or a soft brush attachment on your vacuum to remove dust. Avoid spraying cleaning solutions directly on the fabric to prevent motor damage.
- Blinds: Close the blinds and clean each slat with a damp cloth, flipping them to clean the other side. For wooden blinds, avoid excess moisture, which can cause warping.
- Drapes: Check the care label for washing instructions. Many drapes are safe for gentle machine washing, while delicate materials may require dry cleaning.
A study found that clean windows and treatments can improve natural light penetration by up to 30%, boosting the brightness of your home.

2. Handle with Care
Custom window treatments are an investment, so treat them delicately to avoid unnecessary damage.
Best Practices for Handling:
- Adjust Gently: Use the remote or smart home app to operate motorized shades smoothly. Manually tugging on the shades can strain the motor.
- Secure Cords and Chains: For traditional blinds and shades, keep cords out of reach of pets and children. Use cord cleats or tensioners for added safety.
- Avoid Sharp Objects: Be cautious when cleaning or moving furniture near your treatments to prevent tears or scratches.
3. Perform Routine Inspections
Spotting issues early can save you costly repairs. Routine inspections of your shades, blinds, and drapes ensure everything stays in working order.
What to Look For:
- Motorized Shades: Listen for unusual noises when operating them. A quiet motor indicates smooth functioning, while grinding sounds may signal the need for lubrication or a professional check.
- Blinds: Inspect for bent or misaligned slats and address them promptly to maintain their appearance.
- Drapes: Check for loose threads or stains that might worsen if left unattended.
4. Protect from Sun Damage
While window treatments are designed to manage sunlight, prolonged exposure can fade fabrics or damage certain materials.
How to Prevent Sun Damage:
- Use UV-Resistant Materials: When selecting your custom shades, opt for UV-blocking fabrics that maintain color vibrancy.
- Rotate Drapes: If your drapes have a reversible design, rotate them occasionally to distribute sun exposure evenly.
- Smart Scheduling: Program motorized shades to lower during peak sunlight hours for optimal protection.
Modern UV-blocking shades can reduce heat gain by up to 77%, helping you save on energy bills while protecting your interiors.
5. Make the Most of Smart Features
Motorized shades offer cutting-edge technology that makes everyday living more convenient. Fully embracing these features can enhance your experience.
Smart Usage Ideas:
- Automated Scheduling: Program shades to rise and lower at specific times for better energy efficiency and privacy.
- Voice Control: Pair your motorized shades with smart assistants like Alexa or Google Home for effortless operation.
- Scene Setting: Create customized scenes for different times of day, like “morning light” or “movie night.”
The global smart shades market is projected to grow by over 15% annually, showing how quickly homeowners are adopting this technology.

6. Address Stains Promptly
Accidents happen, but the key to maintaining your window treatments is to act quickly when spills or stains occur.
Quick Stain Removal Tips:
- Blot, Don’t Rub: For fabric shades or drapes, gently blot stains with a clean, damp cloth to prevent spreading.
- Use Mild Detergents: A diluted mixture of water and dish soap works well for most materials. Test on a small, hidden area first.
- Consult Professionals: For stubborn stains or delicate fabrics, consider professional cleaning services to avoid damage.
7. Optimize Placement for Functionality
Where you install your window treatments can impact their longevity and usability.
Placement Tips:
- Avoid Heat Sources: Keep shades and drapes away from radiators, heaters, or stoves to prevent warping or fabric damage.
- Consider Moisture Levels: In humid areas like bathrooms, choose materials resistant to mildew, such as vinyl or treated fabrics.
- Match Function to Room: Motorized blackout shades work great in bedrooms, while light-filtering options suit living spaces.
8. Partner with Professionals for Maintenance
Sometimes, professional care is the best way to keep your custom window treatments in peak condition.
When to Call Experts:
- Motor Issues: If motorized shades aren’t functioning correctly, professional technicians can diagnose and fix the problem.
- Deep Cleaning Needs: For intricate or large-scale treatments, professional cleaning ensures a thorough job without the risk of damage.
- Repairs: Cracked slats, broken cords, or torn fabrics often require specialized tools and expertise.
Many manufacturers offer maintenance plans for custom treatments, so check your warranty to see if repairs are covered.
Enjoying the Benefits of Custom Window Treatments
Proper care and maintenance not only preserve the beauty and functionality of your custom shades, blinds, and drapes but also maximize your investment. With these tips, your window treatments can remain a source of style, comfort, and innovation in your home.
Treat your custom window treatments as you would any high-quality piece of furniture or décor. A little care goes a long way in ensuring they remain a beloved feature of your home for years to come.
How to Find the Best Vacuum for Your Budget
Posted on Thu, 12 Sep 2024 by Guest

Finding the perfect lightweight vacuum cleaner that fits your needs and budget can be a daunting task. With countless options available, ranging from basic models to high-tech machines, it’s essential to understand what features are most important for your specific situation. This guide will help you navigate the world of vacuum cleaners and make an informed decision without breaking the bank.
Assess Your Cleaning Needs
Before diving into the world of vacuum cleaners, take a moment to evaluate your home and cleaning requirements:
- Floor Types: Consider the surfaces you’ll be cleaning most frequently. Do you have mostly hardwood, tile, carpet, or a mix?
- Home Size: The size of your living space can influence the type of vacuum you need.
- Pets: If you have furry friends, look for vacuums designed to handle pet hair effectively.
- Allergies: For those with allergies, HEPA filtration systems are crucial.
- Storage Space: Consider where you’ll store the vacuum when not in use.

Types of Vacuums
Understanding the different types of vacuums can help you narrow down your options:
Upright Vacuums
- Ideal for large carpeted areas
- Often more powerful and have wider cleaning paths
- Can be heavier and more challenging to maneuver
Canister Vacuums
- Versatile for various floor types
- Easier to use on stairs and under furniture
- Typically quieter than uprights
Stick Vacuums
- Lightweight and easy to store
- Good for quick cleanups and small spaces
- Often cordless, but may have shorter battery life
Handheld Vacuums
- Perfect for spot cleaning and small messes
- Portable and easy to use
- Limited capacity and power
Robot Vacuums
- Hands-free cleaning
- Great for maintaining cleanliness between deep cleans
- Can be expensive and may struggle with deep carpet cleaning
Key Features to Consider
When comparing vacuums within your budget, pay attention to these important features:
Suction Power: This is crucial for effective cleaning. Look for models with adjustable suction settings for different surfaces.
Filtration System: HEPA filters are best for trapping allergens and fine particles. If allergies are a concern, this feature is worth the investment.
Bag vs. Bagless: Bagless models save on recurring costs but may require more frequent emptying. Bagged vacuums are better for allergy sufferers but incur ongoing bag replacement costs.
Cord vs. Cordless: Corded vacuums offer consistent power but limit mobility while a cordless vacuum provides freedom of movement but havs limited battery life.
Attachments: Various attachments can greatly enhance a vacuum’s versatility. Look for models that include tools for different cleaning tasks.
Noise Level: If noise is a concern, some vacuums are designed to operate more quietly than others.
Balancing Cost and Quality
While it’s tempting to opt for the cheapest option, investing in a quality vacuum can save money in the long run. Consider these points:
- Durability: A well-built vacuum may cost more upfront but will last longer, saving money over time.
- Warranty: Look for models with good warranty coverage, which can indicate the manufacturer’s confidence in their product.
- Energy Efficiency: Some vacuums are more energy-efficient, potentially lowering electricity costs.
- Maintenance Costs: Factor in the cost of replacement filters, bags, or batteries when considering the total cost of ownership.
Research and Compare
Once you’ve identified your needs and budget, it’s time to research:
- Read expert reviews from reputable sources
- Check user reviews for real-world experiences
- Compare specifications and features of models within your price range
- Look for sales or discounts to get the best value
Test Before You Buy
If possible, try out the vacuum before purchasing. Many stores have floor models available for testing. Pay attention to:
- How well it performs on different surfaces
- Weight and maneuverability
- Noise level
- Ease of emptying and maintaining
Making the Final Decision
Remember, the best vacuum for your budget is one that meets your specific needs without unnecessary frills. Don’t be swayed by fancy features you won’t use. Instead, focus on the core functionalities that will make your cleaning routine easier and more effective.
By carefully considering your needs, researching options, and balancing cost with quality, you can find a vacuum that will keep your home clean without emptying your wallet. With the right choice, you’ll have a reliable cleaning companion that makes maintaining your living space a breeze.
Keter’s outdoor furniture helps residents enhance small-space gathering spots
Posted on Sat, 31 Aug 2024 by Guest

Keter’s small space outdoor furniture offers an affordable and space-saving style for outdoor entertaining and beyond
Small-space outdoor settings often don’t get the recognition they deserve. These patios, sundecks, condo/apartment balconies, and compact urban backyards can become desirable gathering spots. Optimal space design and creative furnishings are a key part of the equation.
Right-sized durable furniture, such as Keter’s versatile outdoor furniture pieces, adds value while respecting each space’s parameters. Together, the components create an inviting setting for outdoor refreshments, al fresco dinners, and spur-of-the-moment gatherings.
Finally, Keter’s outdoor furniture is sustainably built. Each piece contains a steadily increasing percentage of recycled materials. In addition, every Keter furniture item is 100 percent recyclable. Keter’s Chief Executive Officer (or CEO) Alejandro Pena is the driving force behind the company’s enduring sustainability focus.
Snapshot of Small-Space Outdoor Settings
Four small-space outdoor settings can take on maximum appeal. Patios, sundecks, condo/apartment balconies, and compact urban backyards can all become popular destinations. By thinking “outside the box,” homeowners and tenants can optimize their space while avoiding that “crowded” feel. Hosts are also invited to put their distinctive touches on each outdoor environment.
- Paved or Concrete Patios
Patios sometimes aren’t utilized to their full potential. Often, they’re used for storing lawn and garden tools and outdoor gear. With good space design, right-sized furniture, and perhaps some lush green plants, even a smaller patio can become a favorite spot for relaxing after a hectic day.
- Sunny Sundecks
A well-positioned sundeck makes an inviting tanning and relaxation platform. With attractive, durable outdoor furniture, this versatile deck can become a popular entertainment hub. Happy Hour gatherings and dinners under the stars will take on an entirely new look and feel.
- Condo/Apartment Balconies
Condo owners and apartment tenants may regard their balconies as overflow storage areas. With a little ingenuity, these small outdoor spaces can become a pleasant setting to catch some sun or enjoy the evening breeze. With right-sized furniture in the mix, the stage is set for a pleasant gathering spot.
- Compact Urban Backyards
A compact urban backyard can be transformed into an inviting outdoor venue. Think grill-outs, Happy Hours, and neighborhood potluck dinners. A grass or concrete surface can accommodate right-sized furniture and accessories. With creative outdoor lighting, this small-scale space can become a “must visit” destination.

3 Small-Space Design Solutions
Designing an appealing small outdoor space involves planning and creativity. Using right-sized furniture also helps ensure a sense of balance. Three general guidelines are applicable to multiple outdoor settings.
- Expand the Indoor Living Space
When the outdoor area is adjacent to a home’s interior, residents might consider turning the outdoor space into an extra relaxation spot. Using the same general style (and color scheme) will help tie both spaces together.
- Create Two Distinct Zones
If space allows, create well-defined areas for separate activities. For example, a spacious patio may be divided into gathering and dining areas. A plant-covered trellis or weather-hardy room divider can separate the two spaces.
- Cultivate Good Traffic Flow
Small spaces will benefit from good traffic flow. Besides minimizing trip hazards, leaving empty space around furniture pieces makes it easier for hosts and guests to mingle. Hosts should always avoid placing objects in front of doorways or natural access points.

Keter’s Versatile Outdoor Furniture Enhances Small Spaces
Keter’s contemporary outdoor furniture blends easily into small-space settings. Every furniture piece features resin-based construction for outstanding durability. As a bonus, Keter outdoor furniture is well suited to “mix and match” furniture arrangements.
Keter’s well-rounded outdoor furniture collection continues to evolve. These additions largely result from CEO Alejandro Pena’s focus on product innovation and development. The company’s talented product team rises to the challenge, creating a steady stream of new products to satisfy consumers’ tastes.
- 3-Piece Patio Ensembles
Keter’s 3-piece patio sets are ideal for small spaces. Each compact set includes two sloped-back chairs and a small side table. Multiple sets can be grouped together for a conversation hub. All patio sets are designed for use on hard surfaces and lawns.
- Outdoor Storage Benches
Multifunctional outdoor furniture is always a good choice. Keter’s sturdy outdoor storage bench provides extra seating on patios, sundecks, balconies, and small yards. Each bench also offers roomy storage, giving even a small space a “clutter-free” look.
- Adirondack Chairs
Relaxing in a classic Adirondack chair can’t be beat. Available in several styles and neutral colors, these sturdy chairs fit nicely with a side table. Alternatively, hosts may wish to group several Adirondack chairs around the fire pit on a chilly evening.
- Versatile Side Tables
Small side tables are a mainstay of outdoor lifestyles. Available in square and round styles, these neutrally colored tables easily hold drinks and snacks. Paired with Adirondack chairs and even sun loungers, these small tables lend themselves to multiple outdoor uses.
- Outdoor Kitchen Carts
Keter’s outdoor kitchen carts add a new dimension to grill-outs and al fresco dinners. Each cart offers spacious sealed and open storage. The stainless steel top doubles as a food preparation and dining surface. The cart’s wheels enable easy transport from the kitchen to any hard surface or lawn.
- Sun Loungers
Relaxing on the patio, deck, or lawn is a satisfying way to spend a warm afternoon. Keter’s sleek-looking sun loungers offer adjustable backs, and the pieces’ rattan design provides added comfort. Along with their good looks, these sun loungers offer long-term durability.
- Cool Bars
These compact cold beverage servers lend themselves to any small-space outdoor gathering. Cool bars are suitable for poolside get-togethers along with Happy Hours and grill-outs. Each cool bar features 7.5 gallons of storage and a convenient pop-up top that holds drinks and snacks.
Keter’s Continued Emphasis on Sustainability
Thanks to Keter CEO Alejandro Pena, the company’s longstanding sustainability emphasis continues in the 21st century. Pena is behind Keter’s commitment to drastically reduce virgin resources’ use in production operations. Toward this goal, Keter is gradually increasing the percentage of recycled materials in total production.
In addition, Keter’s manufacturing facilities are steadily progressing toward their respective “zero waste” goals. Finally, every Keter product is completely recyclable, further reducing the company’s environmental impact.
Keter’s sustainability focus is matched by its commitment to product innovation. By using bold vision and updated technologies, the company will continue to be a leader in the consumer lifestyle solutions marketplace.
Keter CEO Alejandro Pena summarized his view of the company’s growth. “Keter will continue to be the most innovative company in the industry. Keter will be the most sustainable company and a leader in our industry. And Keter will be an omnichannel-focused, product-centric company where we will serve our customers and consumers wherever they are, whenever they want, in every possible way that they want,” Alejandro Pena concluded.
Essential Tips for a Successful Home Office Makeover
Posted on Wed, 31 Jul 2024 by Guest

Creating a productive and comfortable home office is essential for many South Florida residents, especially with the rise of remote work. However, transforming a space in your home into an efficient office can be challenging. Clutter, inadequate lighting, and lack of organization are common issues that hinder productivity. If you’re struggling with these problems, you’re not alone. This article will guide you through practical steps to achieve a successful home office makeover.

- Assessing Your Home Office Needs
The first step in creating a successful home office is to assess your specific needs. Think about the type of work you do and the tools and equipment you require daily. If your job involves video conferencing, you’ll need a quiet space with a professional background. If you handle a lot of paperwork, ample desk space and storage solutions are vital. Understanding your work habits and requirements will help you create a space that supports your productivity and comfort. - Making Space for Your New Office
One of the biggest challenges in creating a home office is finding the space for it. In South Florida, where homes might not always have an abundance of extra rooms, this can be particularly tricky. However, with some creativity, you can find or make the space you need. Begin by clearing out a room or area that you can dedicate to your office. This might mean repurposing a guest room, a part of your living room, or even a large closet.
To make the process easier, consider moving unnecessary items into a storage unit. This helps declutter your space and makes room for your office setup. Hiring a moving company can be a practical solution to handle the heavy lifting, allowing you to focus on organizing your new office space efficiently. Look up the keyword local moving company South Florida on any search engine to find the right professionals for this task.
Clearing out the clutter not only creates physical space but also contributes to a more organized and stress-free work environment. - Choosing the Perfect Location
Selecting the right location for your home office is crucial. Ideally, you want a spot that is quiet, comfortable, and free from distractions. If you have a spare room, that’s an excellent choice. However, if space is limited, look for a corner of a room that you can transform into a productive workspace. It’s important to choose an area that is away from high-traffic zones in your home to minimize interruptions.
Consider factors like natural light and ventilation when choosing your office location. A well-lit, airy space can enhance your mood and productivity. If possible, select a spot with a window to let in natural light, as this can reduce eye strain and boost your overall well-being. Additionally, ensure that your chosen location has enough power outlets to accommodate your equipment. - Investing in Quality Furniture for Comfort
Once you’ve chosen the location for your home office, it’s time to invest in quality furniture. Ergonomic furniture is essential for comfort and health, especially if you’ll be spending long hours at your desk. Start with a good office chair that provides proper support for your back and encourages good posture. Your chair should be adjustable so that you can set it to the right height and angle for your desk.
A spacious desk is also important. Make sure it has enough surface area to accommodate your computer, paperwork, and other essentials. If space is an issue, consider a wall-mounted desk or a compact desk that fits your room’s dimensions. Investing in quality furniture may require some upfront costs, but it will pay off in terms of comfort and productivity in the long run. - Optimizing Lighting for Better Productivity
Proper lighting is a key component of a productive home office. Natural light is ideal, so try to position your desk near a window. Natural light not only reduces eye strain but also helps regulate your sleep patterns and mood. However, if natural light is not an option, ensure your office is well-lit with a combination of overhead and task lighting.
Consider using LED bulbs, which provide bright, clear light and are energy-efficient. A desk lamp with adjustable brightness can help you focus on specific tasks, while an overhead light can illuminate the entire room. Avoid harsh, direct light that can cause glare on your computer screen. Instead, aim for diffused, even lighting that creates a comfortable working environment. Proper lighting can significantly enhance your focus and productivity, making it a worthwhile investment. - Organizing Your Workspace Effectively
A well-organized workspace is essential for maintaining focus and efficiency. Start by decluttering your desk and organizing your supplies. Use shelves, cabinets, and desk organizers to keep everything in its place. Consider investing in drawer dividers and storage bins to compartmentalize your office supplies and paperwork. Labeling these compartments can further enhance organization and make it easier to find what you need quickly.
Implement a filing system for your documents to avoid piles of paper accumulating on your desk. Digitalize as many documents as possible to reduce physical clutter. Use cable management solutions to keep cords and wires neatly arranged, preventing a tangled mess under your desk. By keeping your workspace tidy and organized, you create a more pleasant and productive environment. - Incorporating Essential Technology
Incorporating the right technology is crucial for a modern home office. Start with a reliable and fast internet connection to ensure smooth communication and efficient work processes. Depending on your job, you might need additional technology such as a high-quality printer, scanner, or external hard drives for data backup.
Invest in a good-quality computer that meets your work requirements. If you frequently attend video conferences, consider getting a high-definition webcam and a quality microphone. Keep your technology organized with cable management solutions and docking stations. Ensure all your devices are up-to-date with the latest software to enhance performance and security. By equipping your office with the necessary technology, you can improve your productivity and work experience. - Planning for Future Adjustments and Growth
As your work evolves, your home office needs may change. It’s important to plan for future adjustments to accommodate new equipment, work habits, or even changes in your job role. Stay flexible and open to rearranging your space as needed. Consider modular furniture that can be easily reconfigured or expanded.
Regularly assess your office setup to identify areas for improvement. Stay updated with new technology and organizational tools that can enhance your productivity. By planning for future adjustments, you ensure that your home office remains a dynamic and efficient space that grows with your needs.

Conclusion
A successful home office makeover in South Florida involves thoughtful planning and execution. By assessing your needs, creating a dedicated workspace, investing in quality furniture, optimizing lighting, and staying organized, you can transform any space into a productive home office. Incorporating essential technology, adding personal touches, ensuring proper ventilation, and planning for future adjustments will further enhance your office environment. A well-designed home office not only boosts productivity but also improves your overall work experience. Start your makeover today and enjoy the benefits of an efficient and comfortable home office tailored to your needs.