Displaying posts labeled "Kim’s House"
A little bedroom update
Posted on Wed, 12 Nov 2025 by KiM
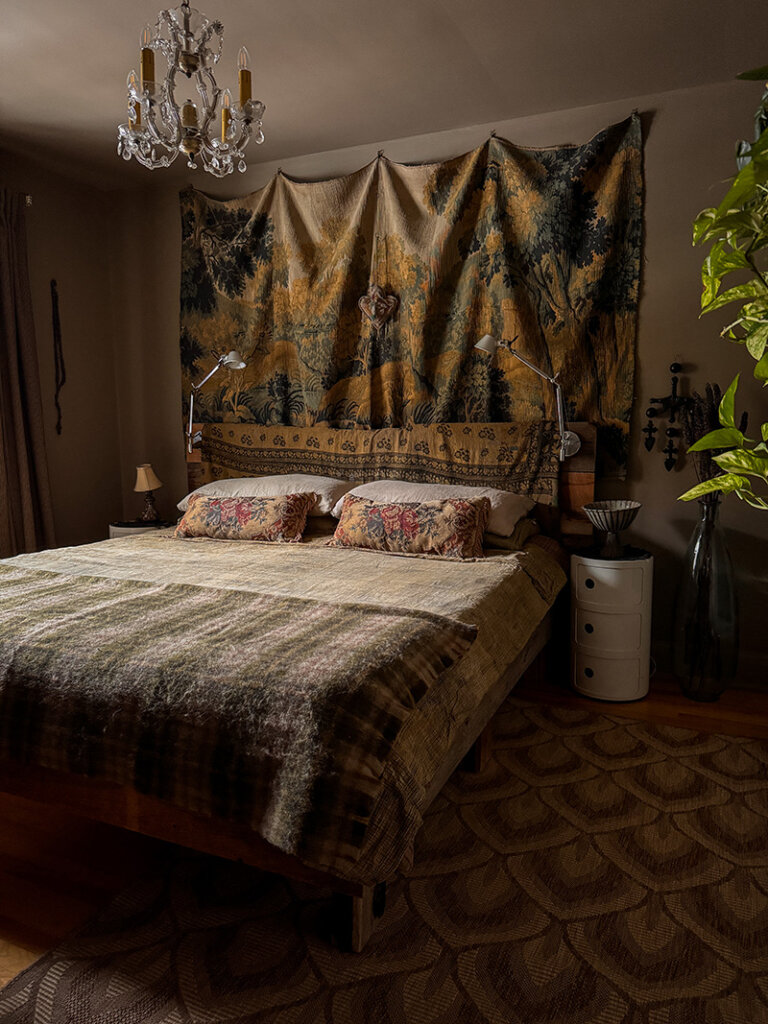
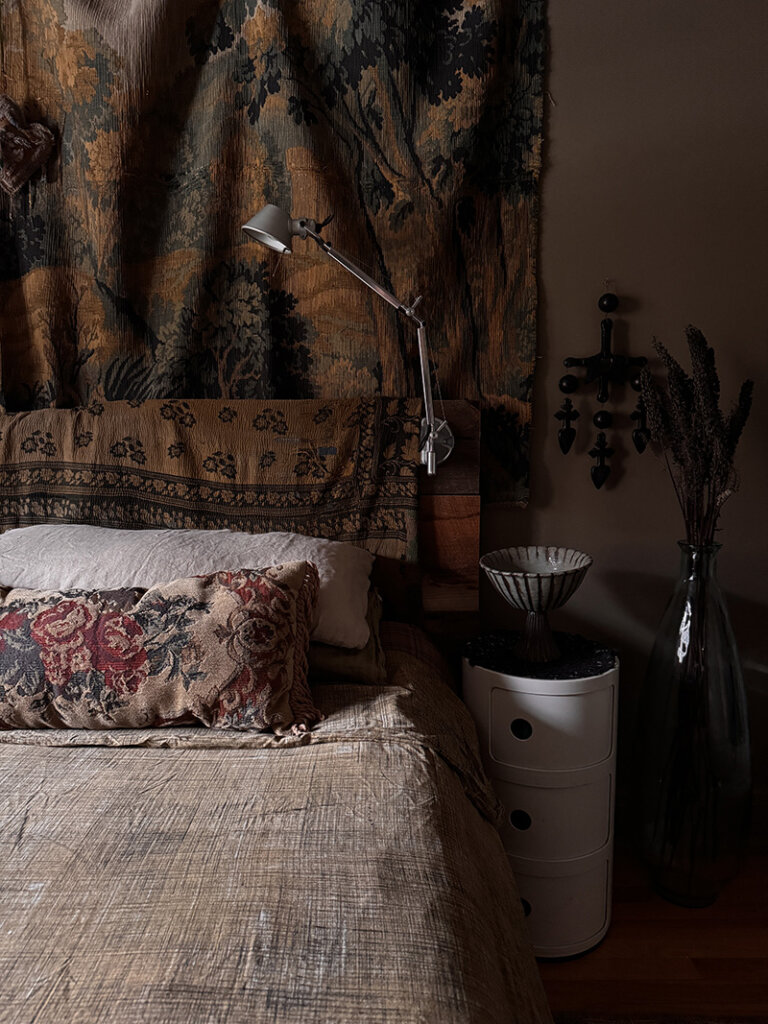
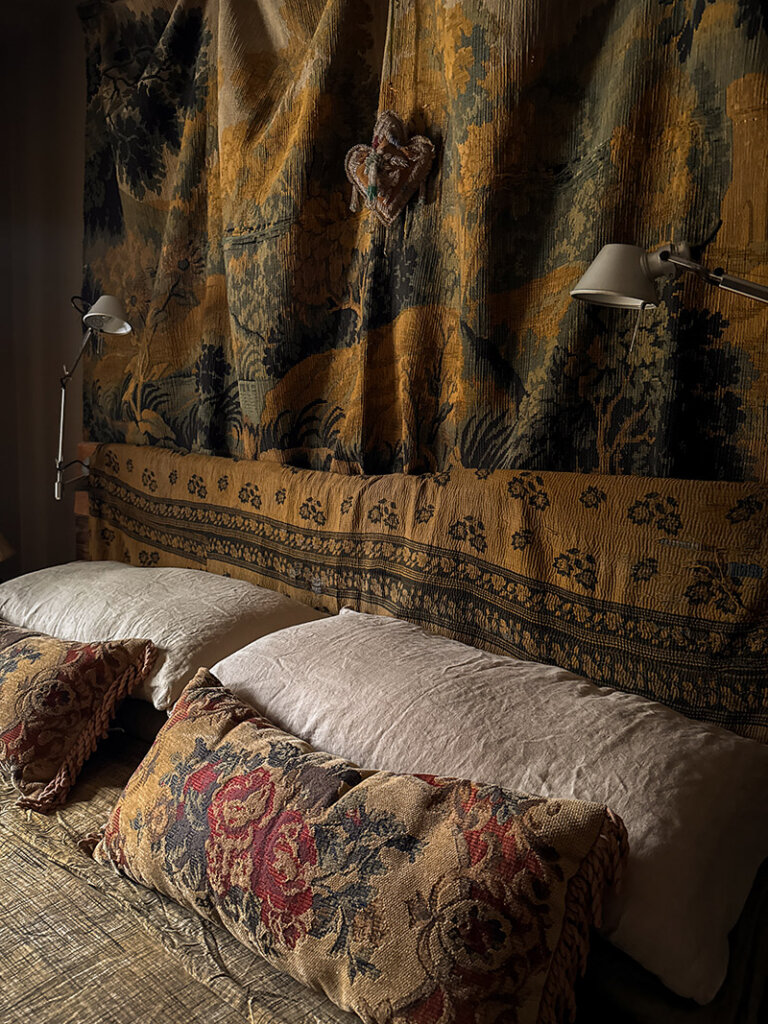
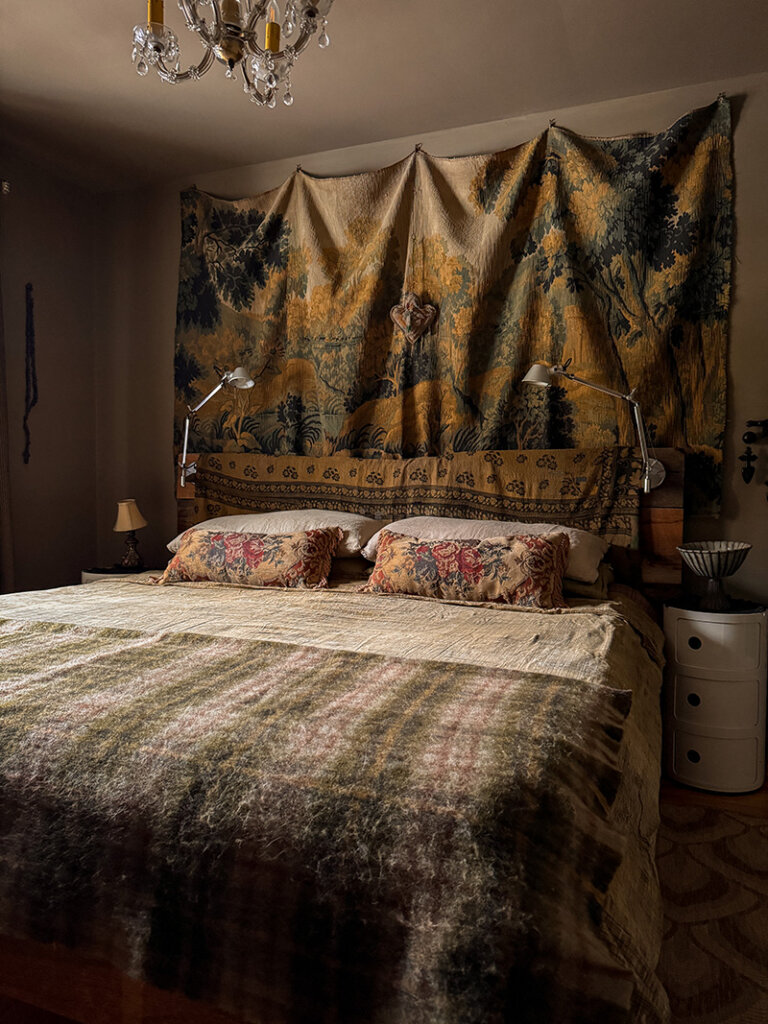
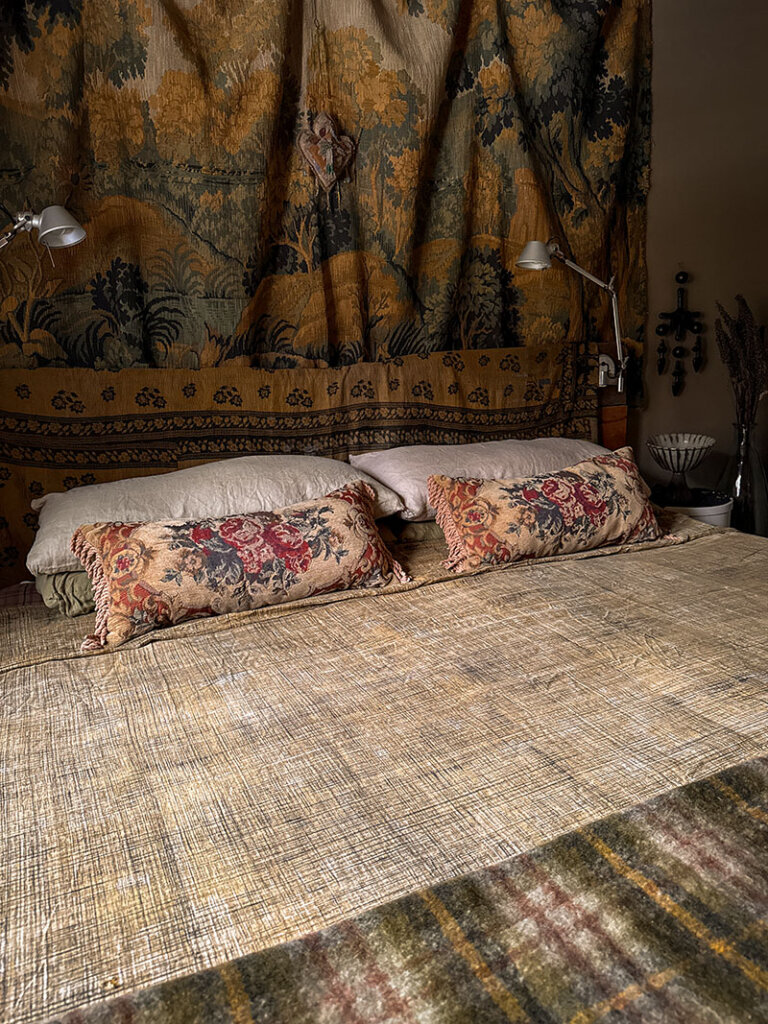
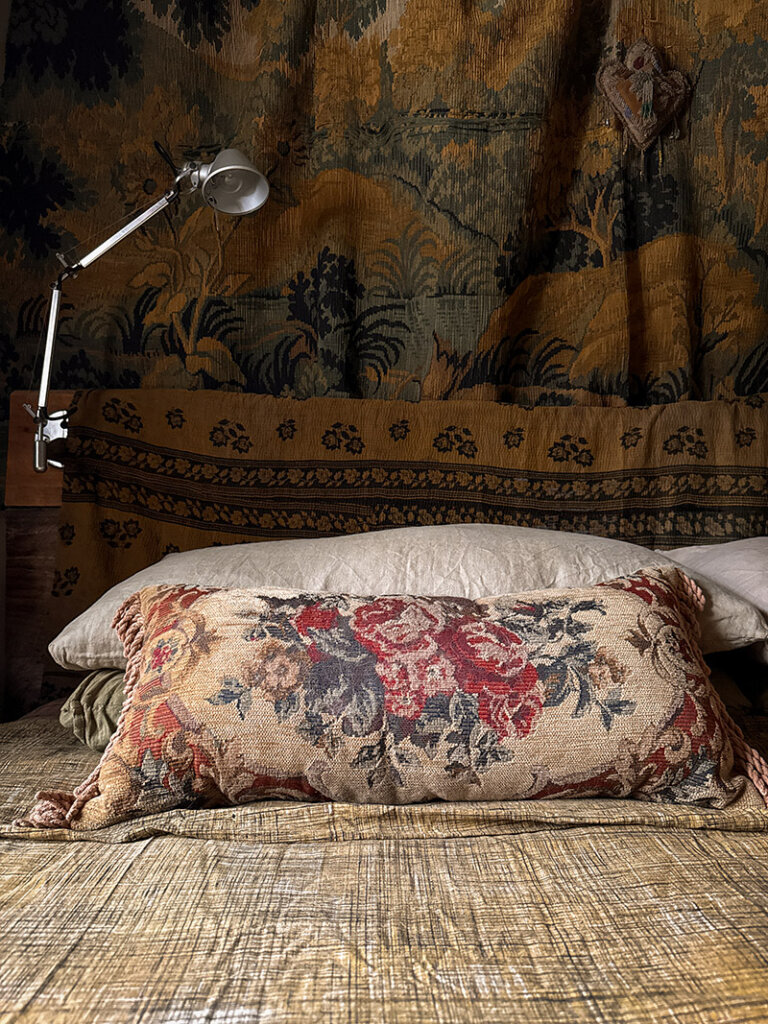
In September I went on a girls’ trip to Quebec City for 4 days and we all had an absolute blast – it was my first time in this extraordinary city. Last month my husband and I needed to drive to Prince Edward Island for a wedding so we decided to stop in Quebec City to break up the long 14.5 hour drive. We had a blast once again and stayed in the cutest historical homes turned into little boutique hotels. On our stop on the way to PEI we hit up “antique row” in Old Quebec which consists of about 3 antique stores (LOL) and in one I found a pile of textiles. I of course had to rummage through it because my obsession with textiles is extreme. And in it I spotted a tapestry. I nearly had a stroke. It had no price and I could not open much of it because it seemed very large and the store is very small and full. So I unfolded it slightly, tried not to stroke out, and asked the owner how much he wanted for it. He said it was in rough shape, so he’d sell it for $75. WHAT?!?!?! I thought for sure I was going to have a stroke at that point, and I said I love things that are not perfect, and I’d take it. When we got to PEI I unfolded it and it was the size of my mother in law’s 3 seater sofa. 58″ x 110″ to be exact. Where do I hang something so large? How about in a draped fashion behind my bed? PERFECTION!!! I could not love this thing more, and is the best $75 I have spent maybe ever. I switched out the blanket I had draped over the raw wood headboard for a kantha quilt, realized I had matching tapestry-like pillows (that I found in 2 different thrift stores years apart), a duvet cover that is on its last legs, and a Zara wool blanket I bought last year. At the last minute I pulled out some curtains I bought a couple years ago at Simons on super sale, and hung them up with some strategically placed safety pins (too long). Voila! What do you think?


A feature on my beloved home
Posted on Sun, 4 Aug 2024 by KiM

I was so excited to learn recently that Apartment Therapy, one of the few blogs that has been around longer than ours, wanted to feature a tour of my home. A wonderful photographer, Craig Kellman, came by at the end of May to take photos and Adrienne Breaux did a lovely write-up. It is such an honour to have my home shared on such a prestigious blog, and the photos turned out so beautifully. And there’s even a couple of photos of me, which is rare, as well as my dearly departed best friend Mimin, who we had to say goodbye to on June 25. No, this isn’t some incredible château in France or Italy as per my typical Sunday content, it is my humble abode but I wanted to share this news and honour this home we will unfortunately soon be selling. Here is the link again to my house tour, with tons of more photos. I hope you like it 🙂


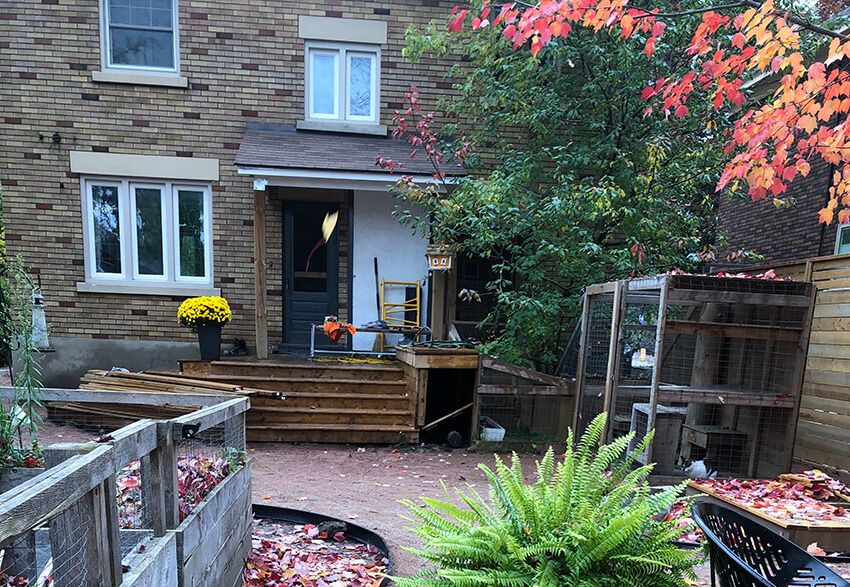
My DIY catio – an outdoor enclosure for our cats
Posted on Tue, 12 Sep 2023 by KiM
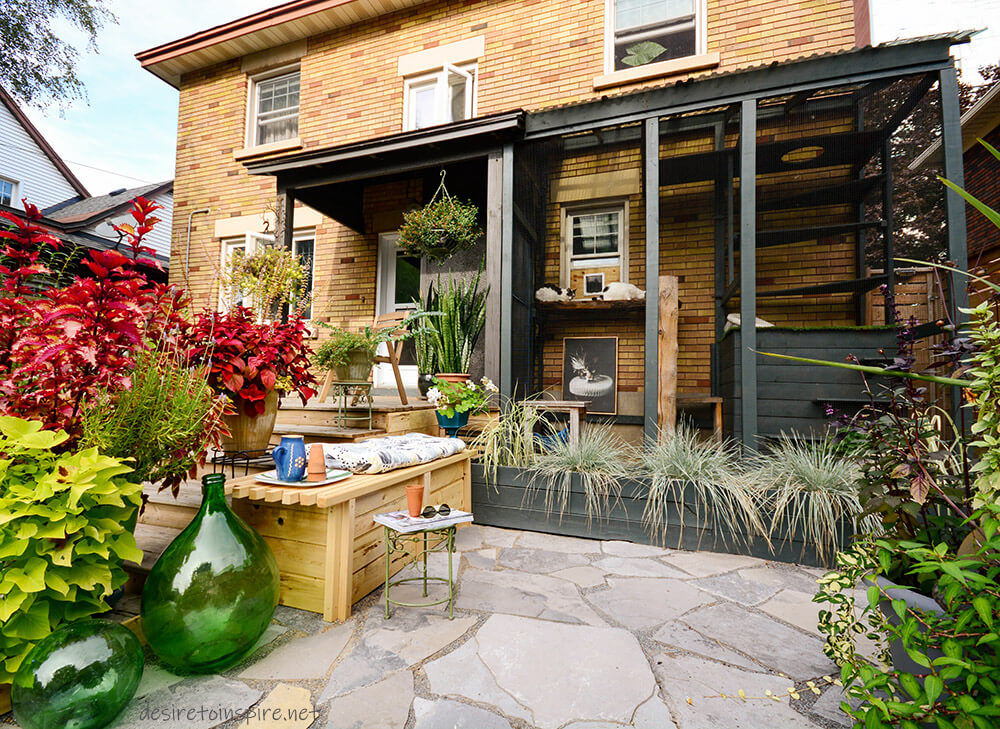
I have been wanting to share the catio we built last summer for a while now but we ended up redoing this whole section of the backyard and with a busy summer this year it took forever but I’m happy to report this area is finally complete!
This is in fact the third iteration of a catio we’ve built back here and it seems third time is a charm. The previous versions were not at all cute and took up way too much space, but were soooo well used by our 2 semi-feral cats Bernie and Frankie that we knew we needed to rebuild it and make it better.
Let me show you the first iteration so you can see how far we’ve come…
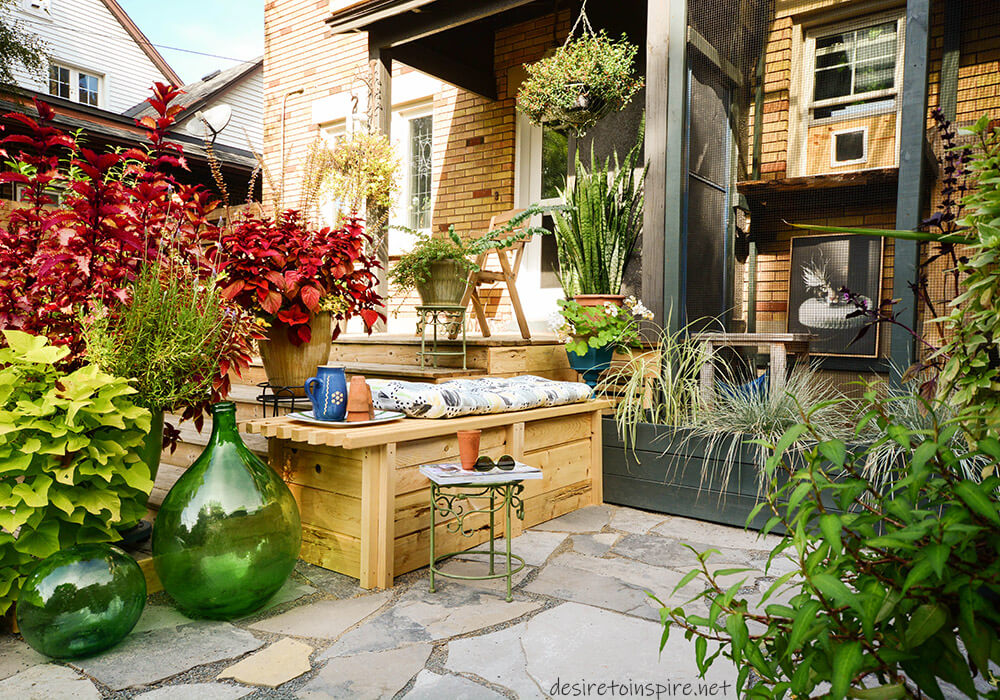
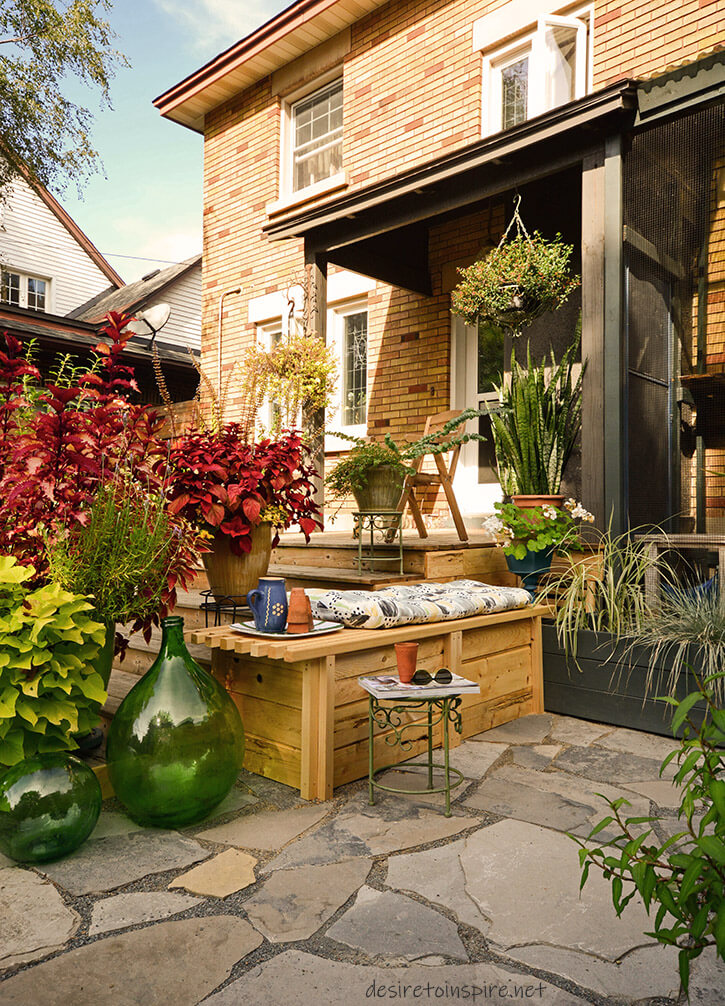
My husband whipped this beast up one weekend in 2019 as we started working on the landscaping of our backyard with no real plan. Behind it is a tree that one day appeared in that corner and kept growing and growing until it got to be about 4 stories tall and we realized we should cut it down as it was too close to the house. And the open section right up against the porch stairs next to the catio is what husband had built to store our garbage cans. After a couple years of that we realized it was too bulky and unsightly so we basically removed everything from the edge of the stairs to the fence. After removing the tree, old catio and garbage cover we ended up with a whole corner of the yard free. So it became the catio and barbecue area, and looks soooo much better.
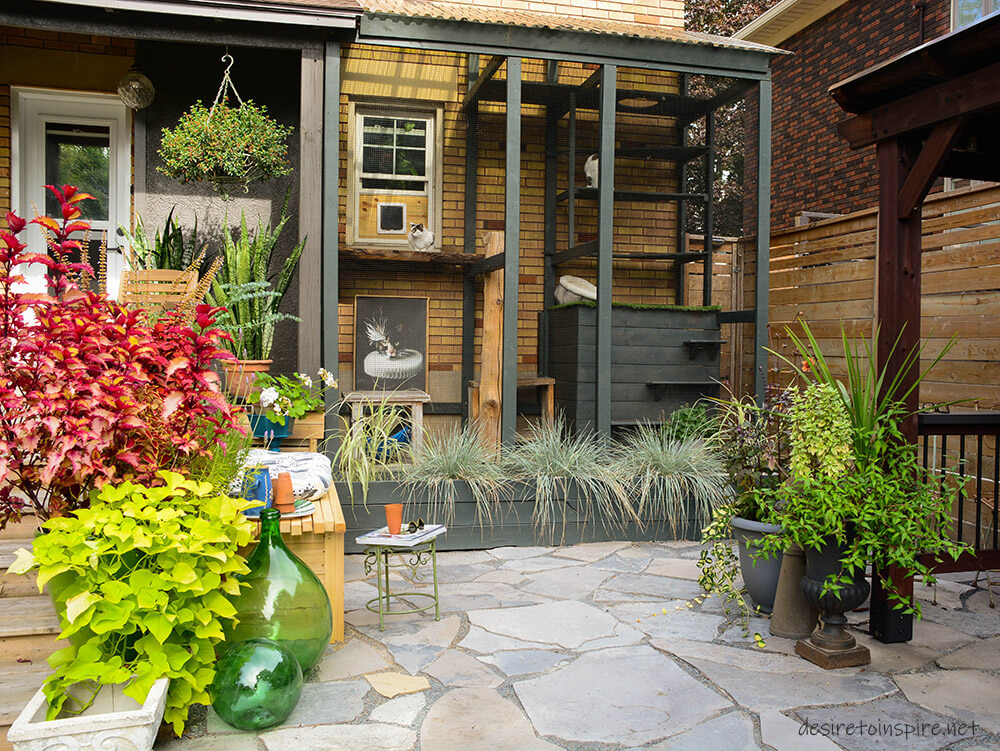
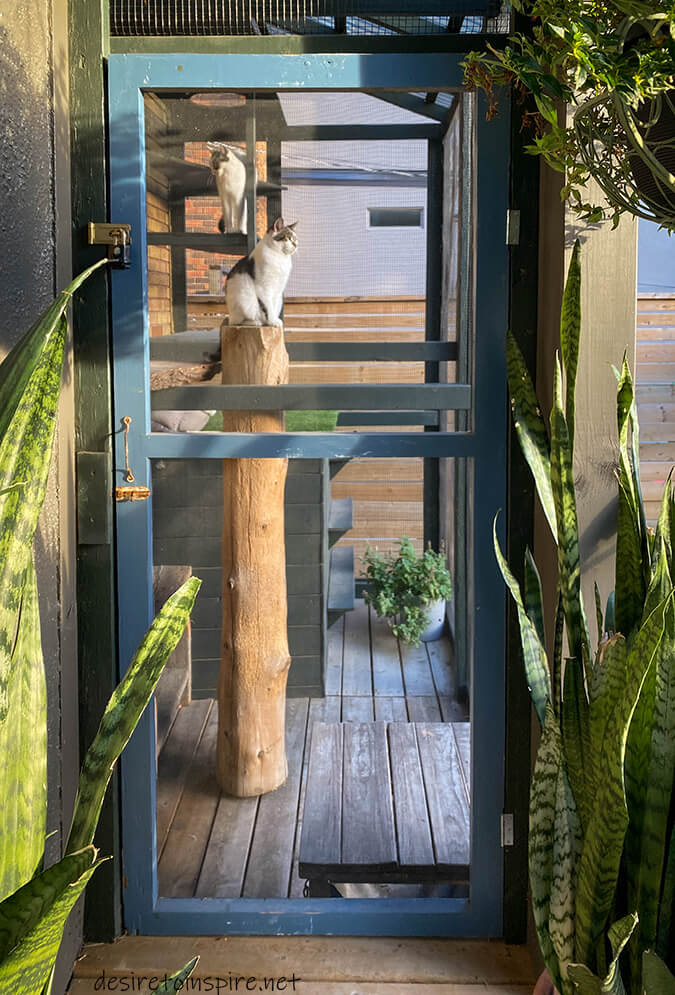
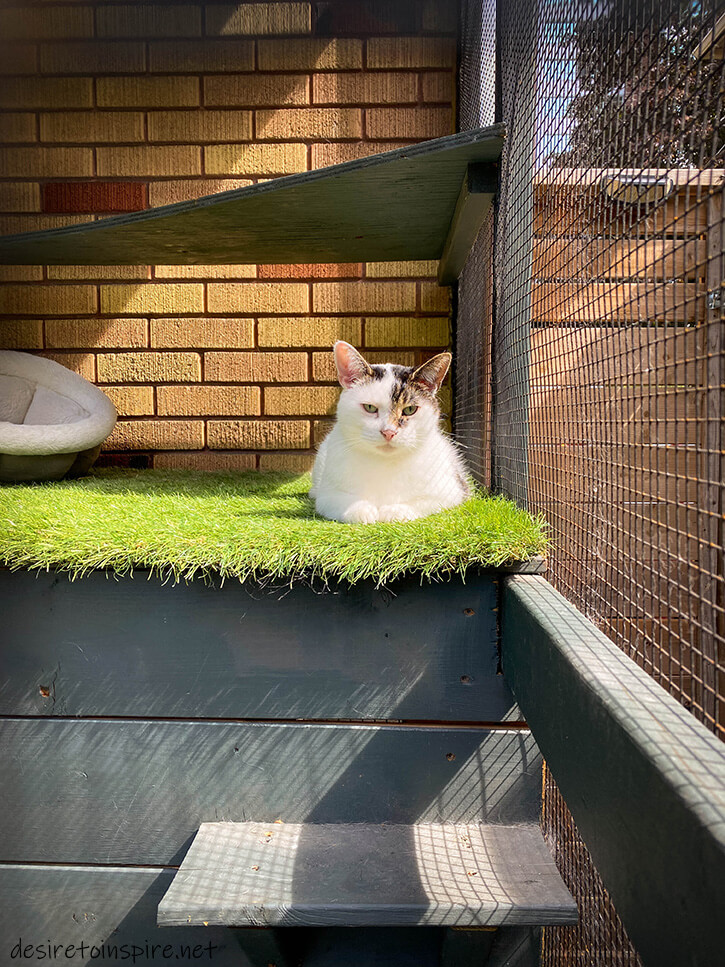
Now the catio is up against the house – it’s size being 10′ wide x 5′ deep x 12′ high. And the cats really love the height in particular because it allows them a great view into the neighbour’s yard so they can spy on their cat and dog.
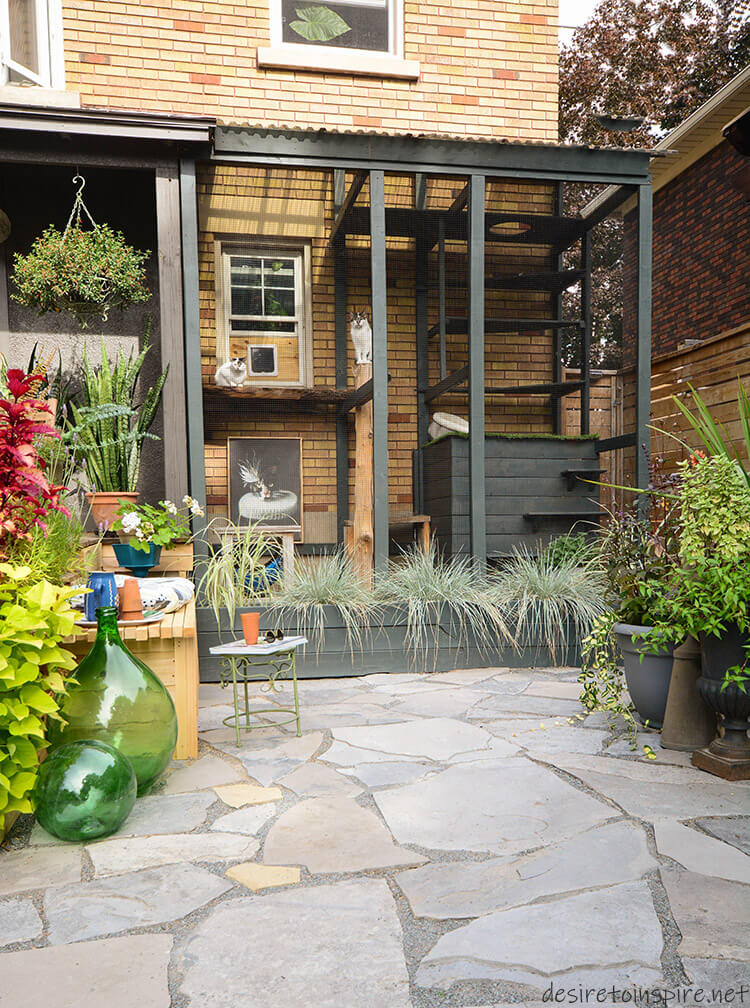
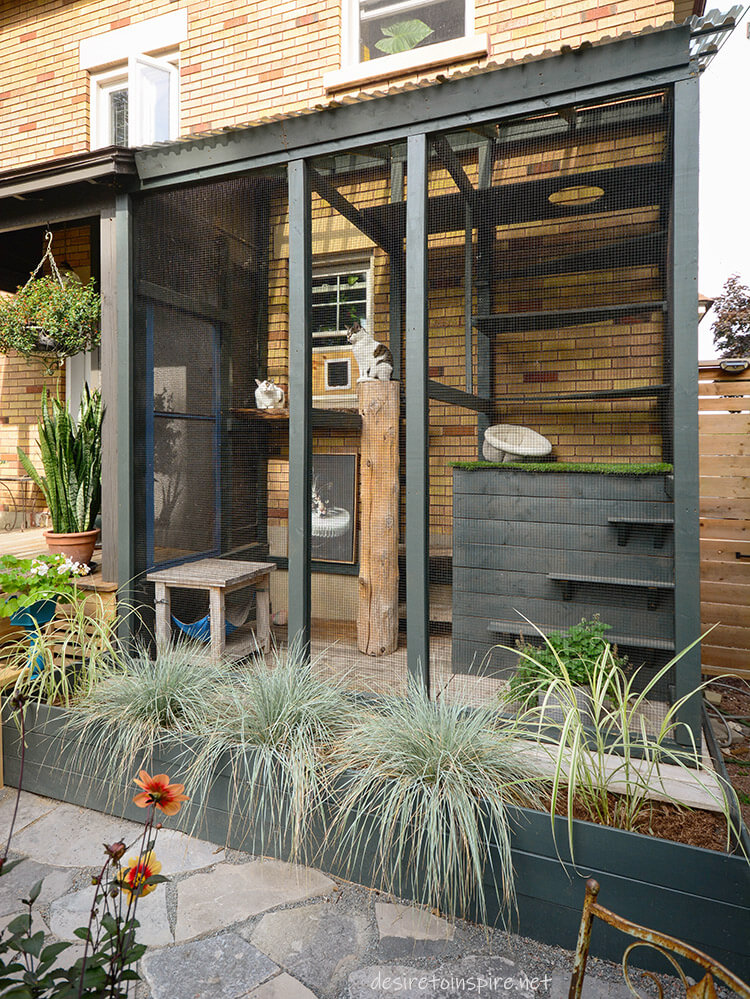
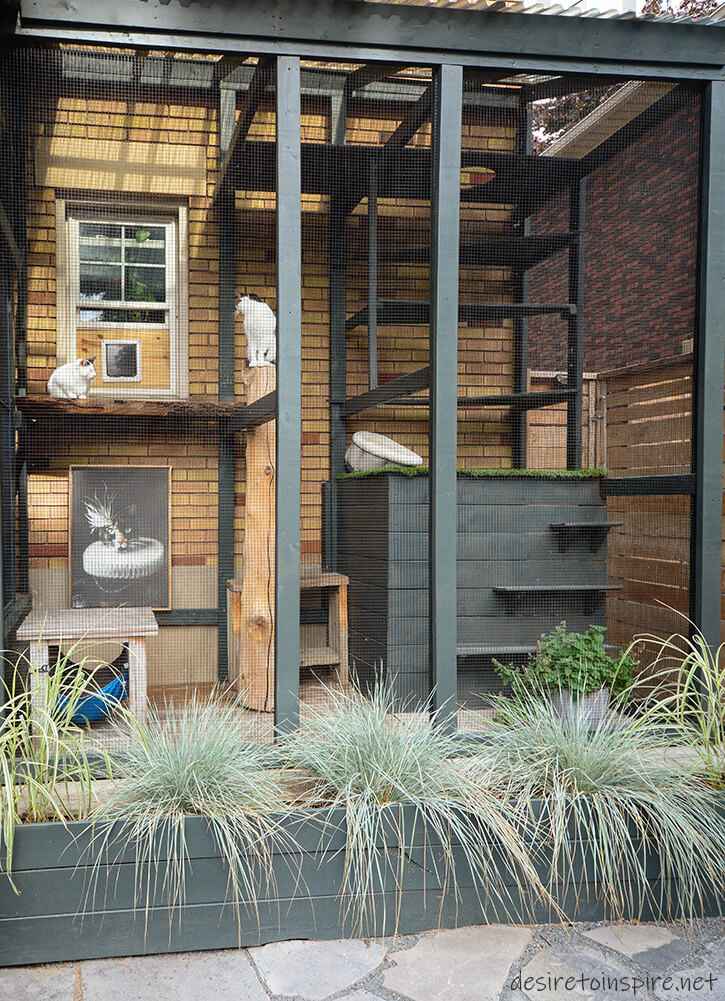
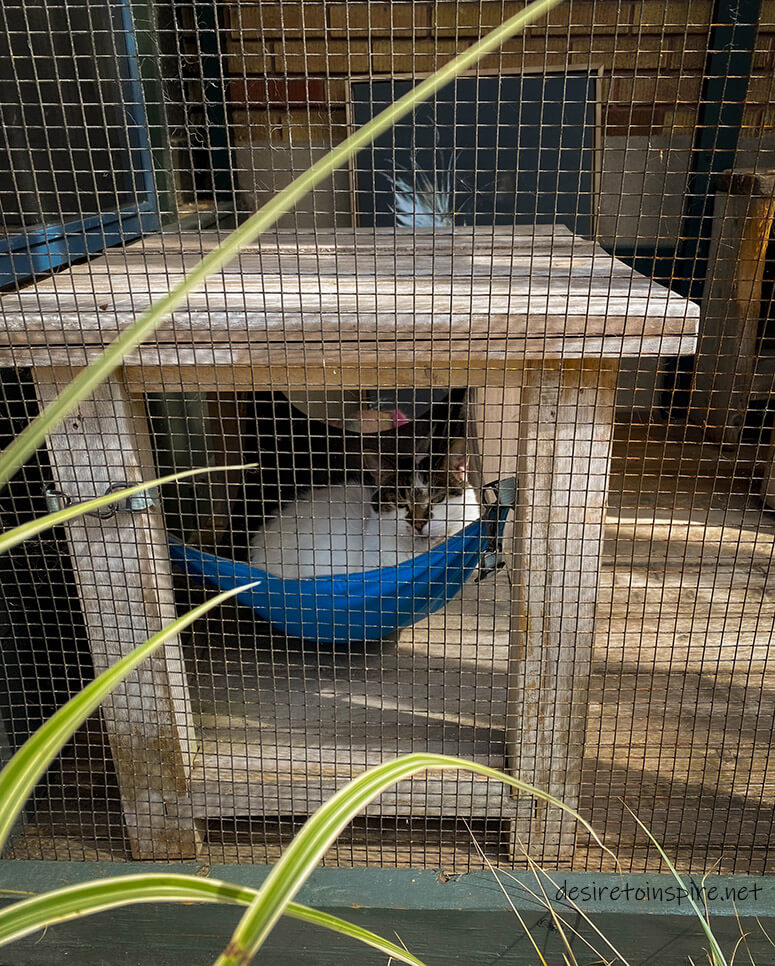
They can come in and out through a flap/dog door in a kitchen window onto a live edge shelf. There’s a beam there that helps support an old log that they love sharpening their nails on, and they use it to climb from the base up to the window shelf. There’s a couple little tables in there too (one has a hanging cat hammock) and to the right is a box that was built around our AC unit, that has shelves on the front, and astroturf on the top. I added Frankie’s favourite fluffy cat bed on there too and he sleeps in it for hours on end. Above that are 4 shelves, with the bottom 3 being cut at angles so they can climb from one to the other and a hole cut out on the top one to get all the way up. The roof is covered in tinted PVC roof panels and the entire thing is wrapped in black steel wire mesh to keep the critters out. The whole thing sits on the deck we had built back in 2019 for our barbecue. We also installed a door on the porch for us to get in and out of it (with a door we found at Habitat Restore).
Where the garbage bin section next to the porch used to be husband built a bench so we can chill while he grills.
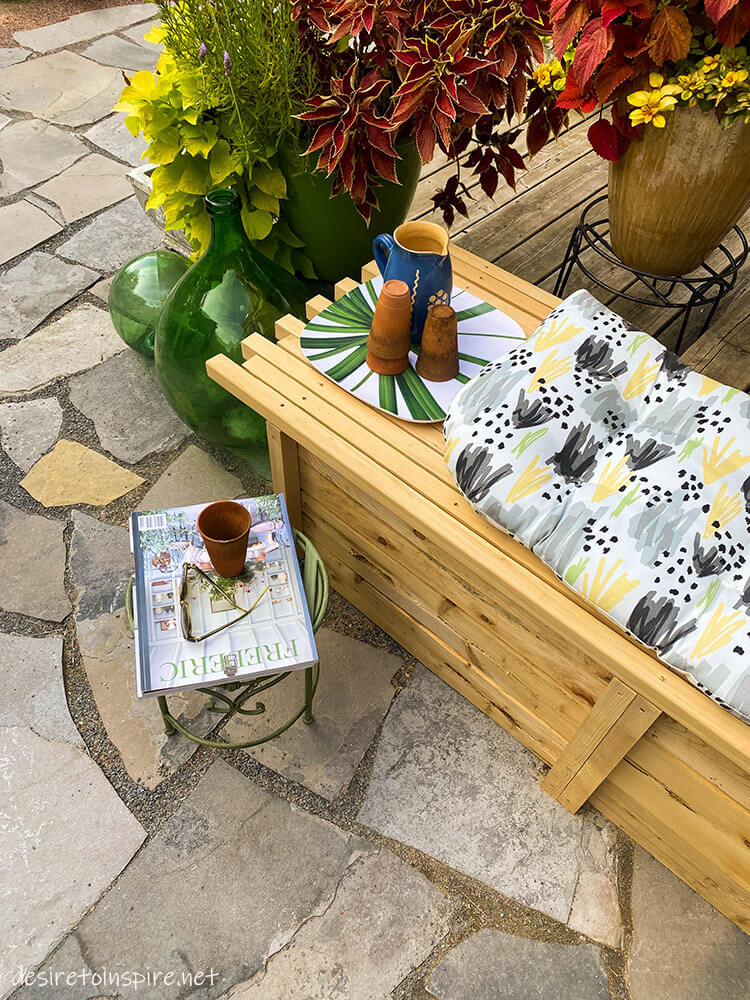
I could not love this space more, and am so pleased things are looking a little more thought out and it’s so much more space saving. Those 2 cats spend almost all summer in that catio (and insist on eating their meals in there) and come winter we cover the whole thing in plastic so they can use it all year. It is by far one of the best projects we’ve ever tackled ourselves. And here’s a few extra photos of Bernie and Frankie living their best catio lives.

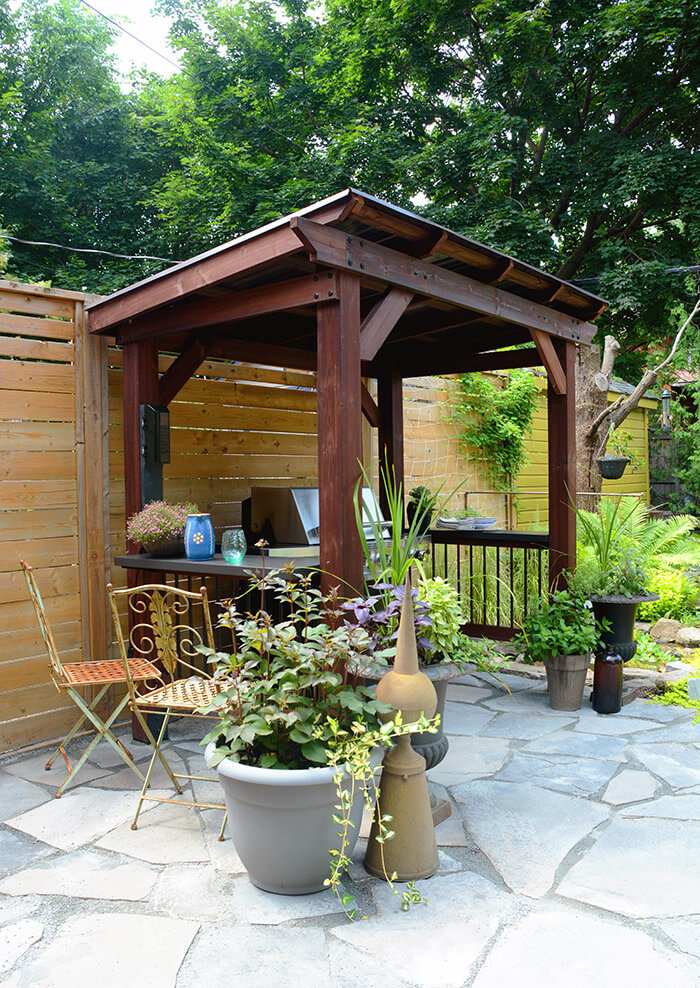
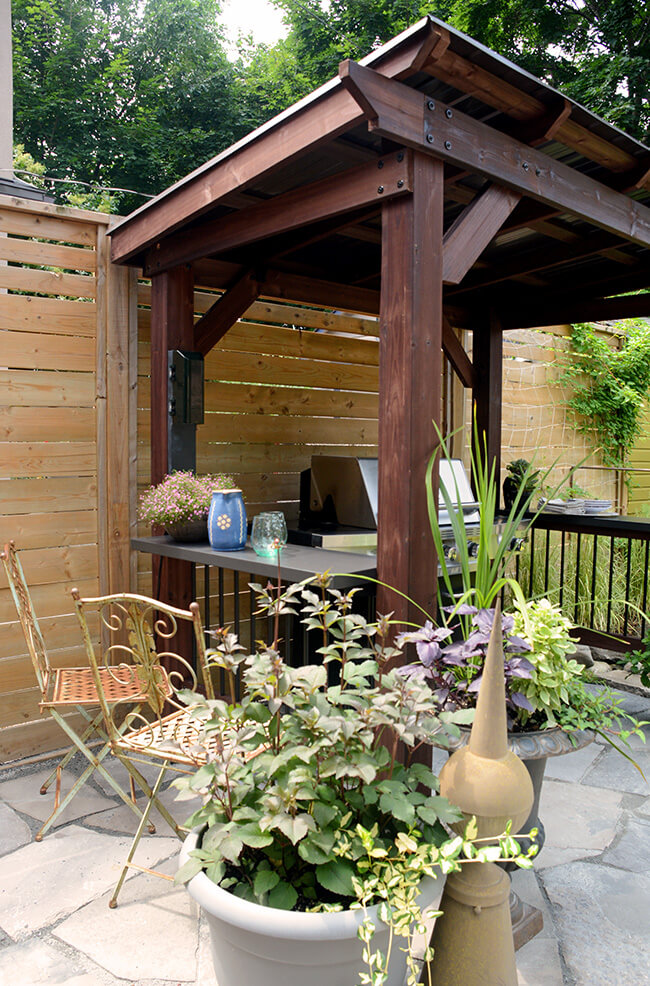
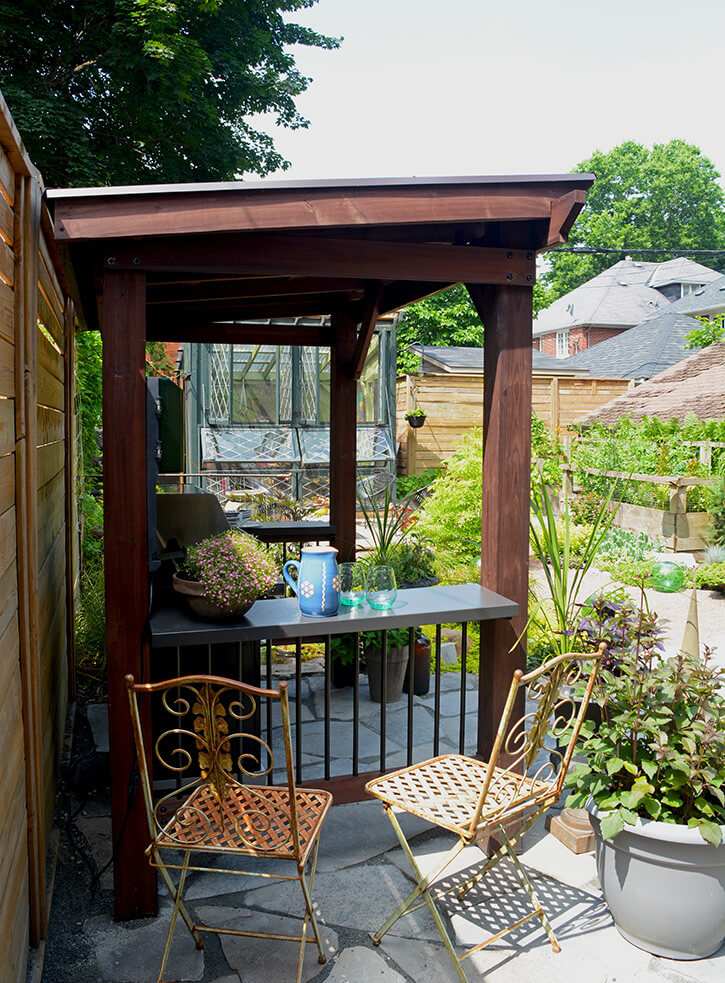
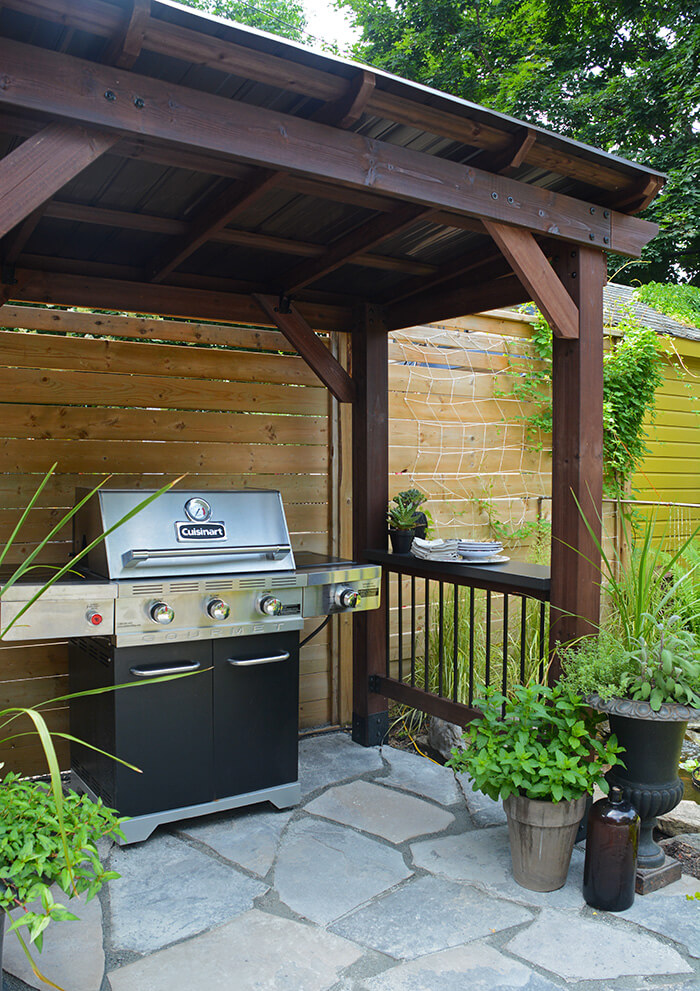
My new grill gazebo by Backyard Discovery
Posted on Tue, 4 Jul 2023 by KiM
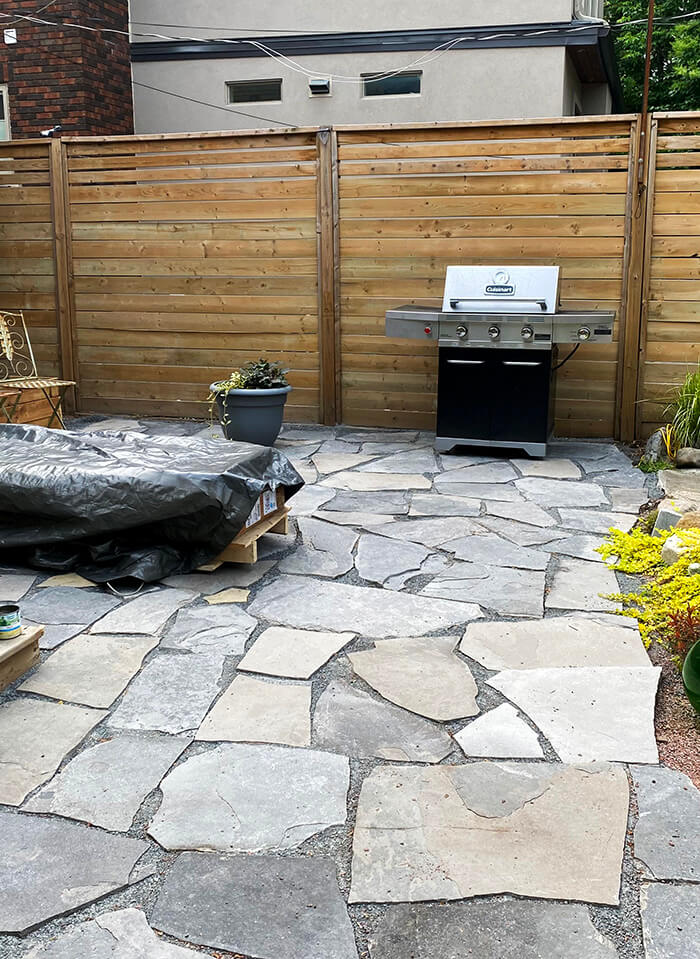
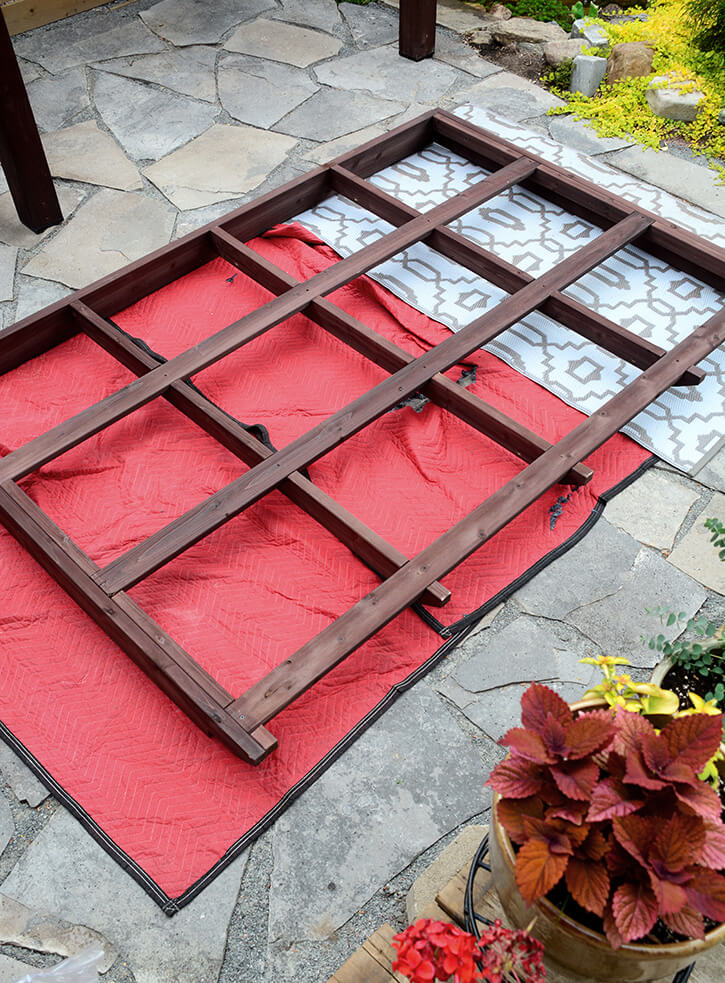
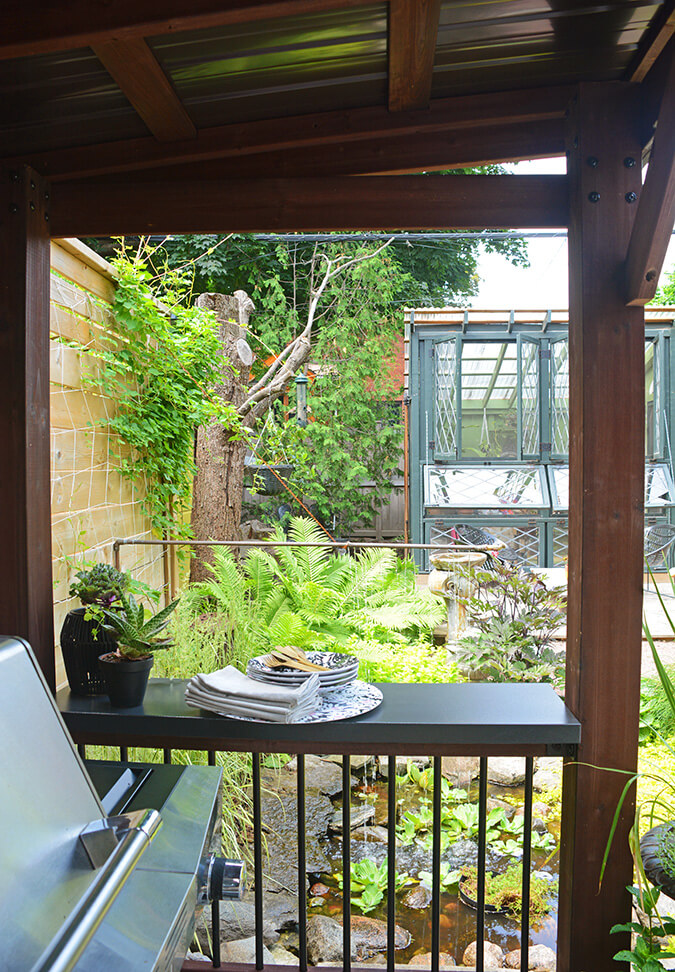
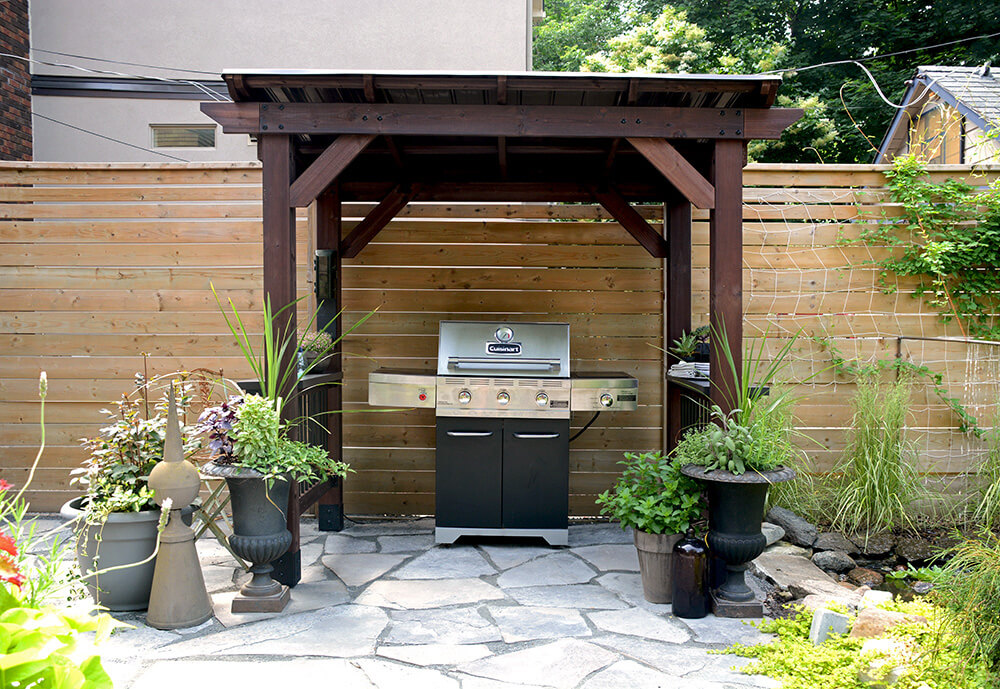
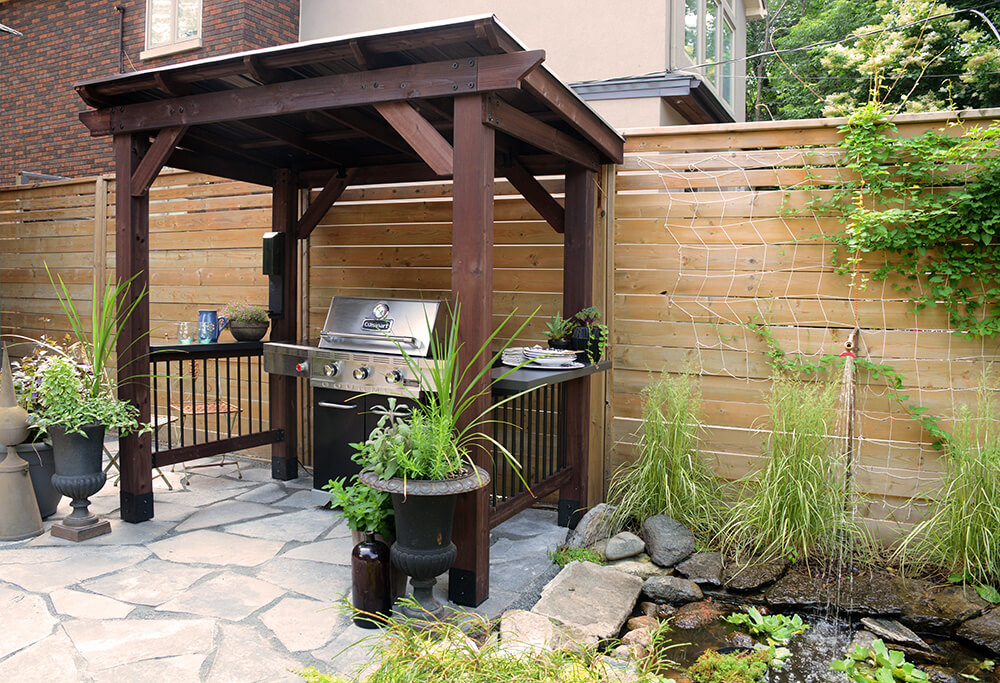
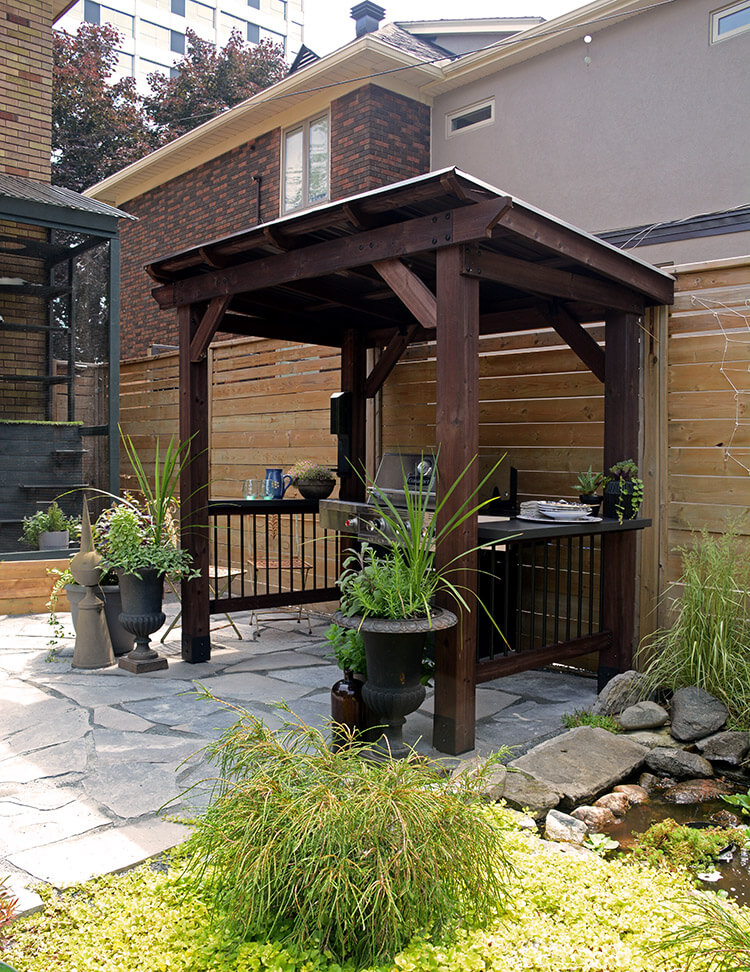
My backyard has gone through some changes over the past few years since we started working on it. One of the things we did recently was remove a tree and a badly designed catio in the corner of our yard and we ended up with this rather large area of essentially unused space. We laid some flagstone we bought for $200 on Facebook Marketplace and decided this would become a barbecue area. My husband was going to design and build a gazebo to put over the barbecue (for some reason he hates cooking in the rain LOL) but to my absolute delight, the folks at Backyard Discovery reached out about the recent launch of their new Canadian site, backyarddiscovery.ca, and offered me one of their products to test out. When I learned that among play structures, pergolas and gazebos, they had actual grill gazebos I could not believe my luck! Not that I didn’t think my husband could build one, but I am 150% sure this went WAY smoother and looks better than what he would have come up.
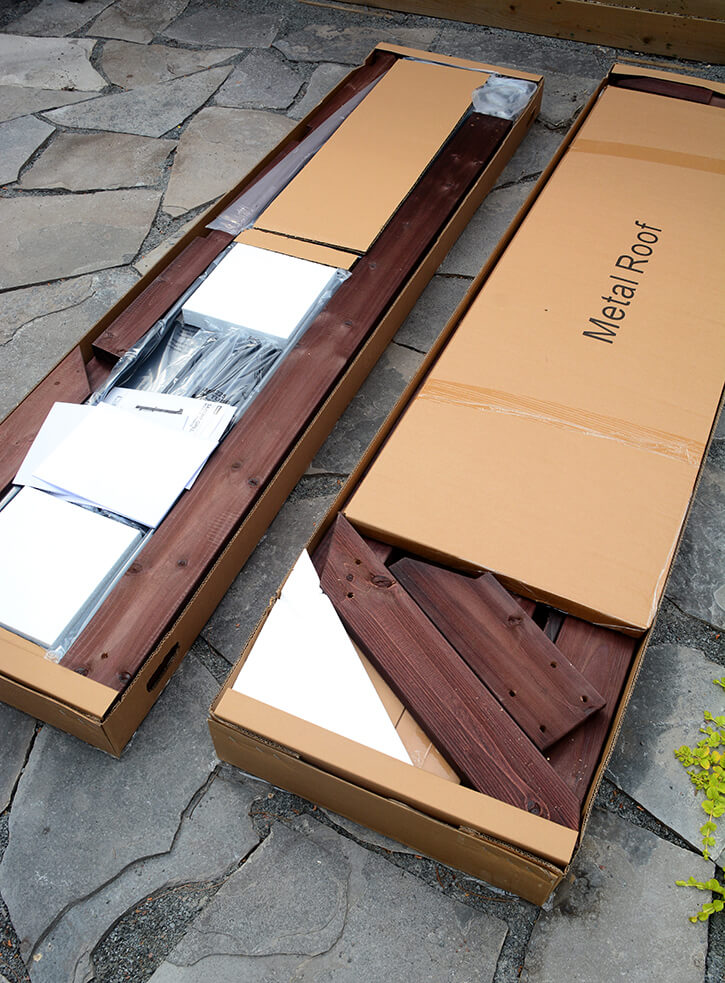
I went with the Saxony grill gazebo, which is perfect for an “average” size barbecue (up to 70″ wide) and really fit the space we had to work with without being too bulky. It comes ready to assemble in pre-stained cedar, with a roof made of steel so it can withstand our Canadian winters and the snow they naturally come with. It requires 2 people to put together so my husband and I tackled it together. He’s got a slew of tools in his workshop so we had everything we needed (and much more) to be able to put it together, but really it just needed the basics (ie. hammer, wrenches, screwdrivers, drills etc).
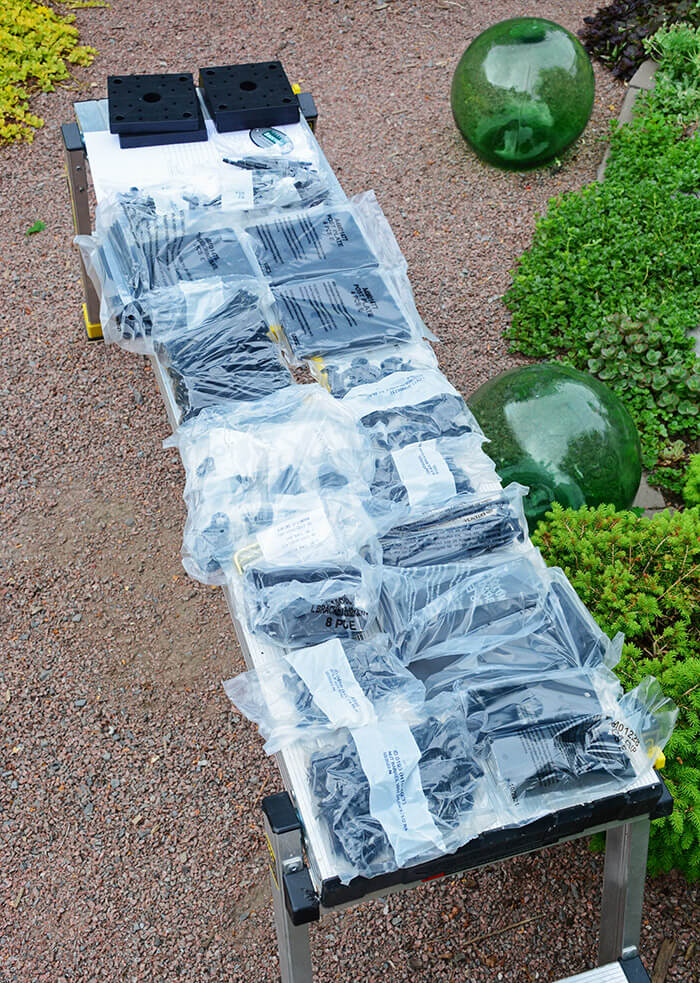
When we unpacked everything I got a little nervous because there were MANY bolts and screws and doodads as per the above photo, and the instructions did say it would take 2 people around 4 hours to put together. Realistically it took a bit longer than that with some sanity breaks thrown in, and went faster as we learned some “tricks” – one important one being that while the holes are pre-drilled, we discovered after stripping a few screws inexplicably that there was a lot of debris from the pre-drilling in the holes so we used a long screw to jam in to all the holes to clear them before drilling.
We started with the basic structure:
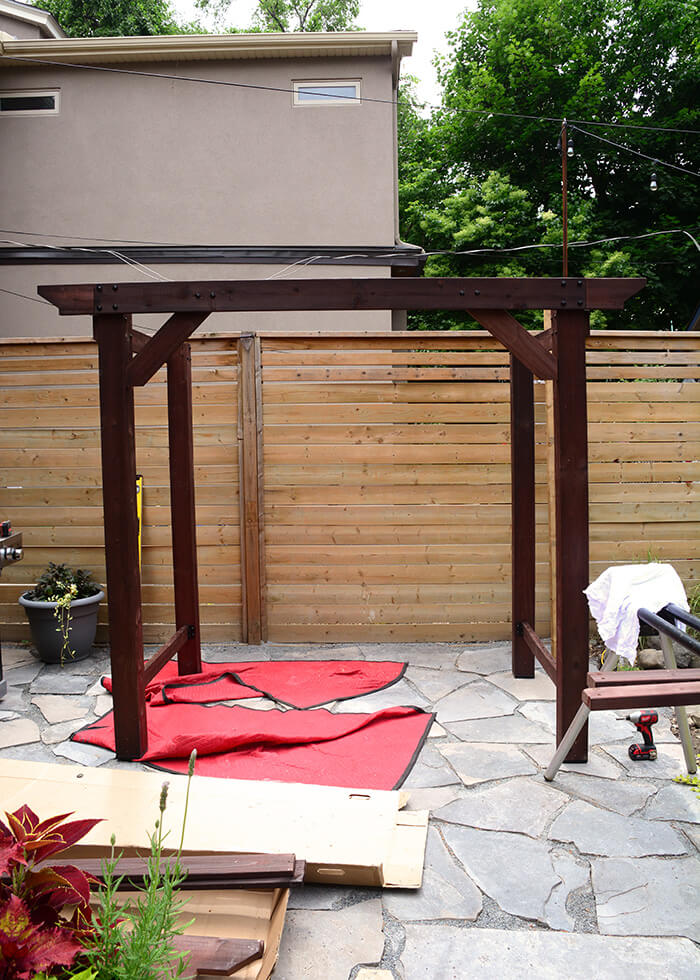
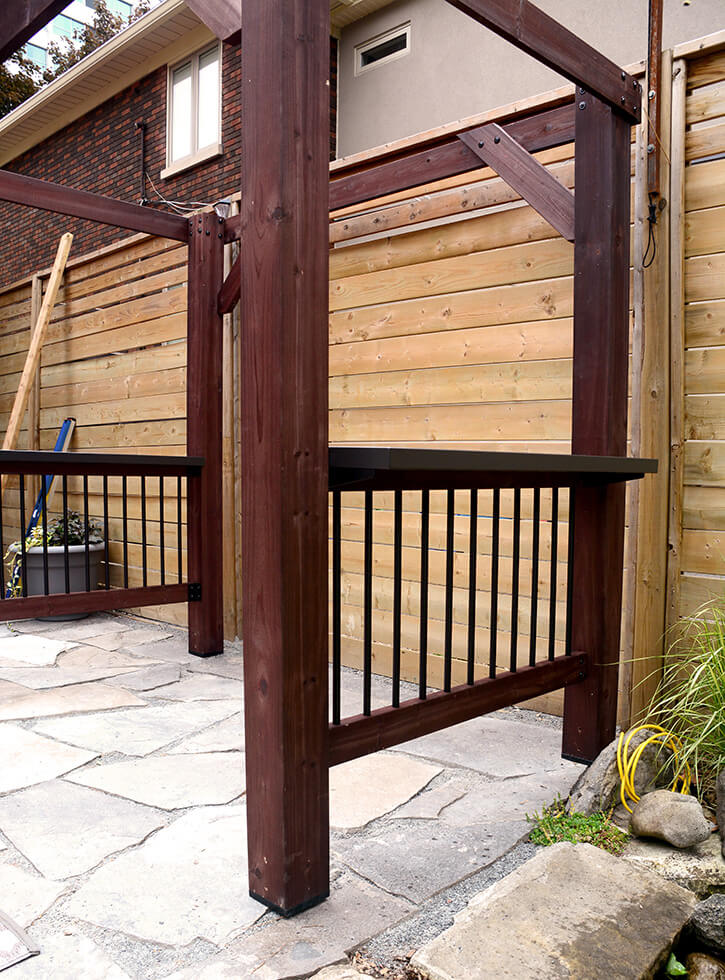
Then we added the side sections that included steel balusters and powder coated steel countertops (LOVE this extra space for serving and prepping food and hanging out and enjoying a drink – it’s almost like a little bar!):
Then we tackled the roof. My husband built the frame while I peeled off the very-stuck-on coating on the steel roof panels.
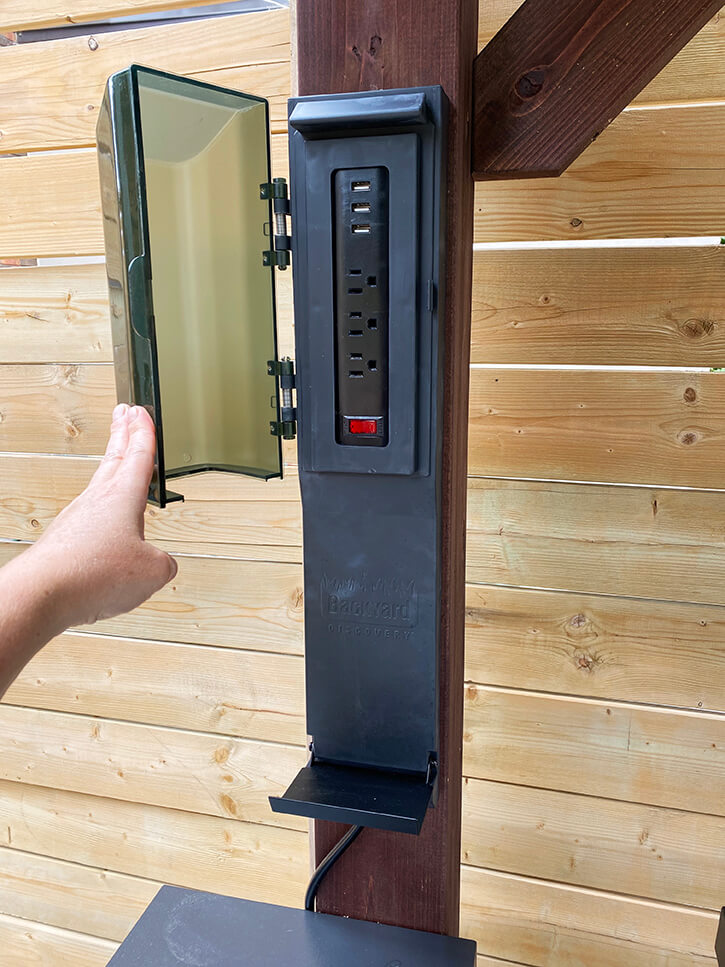
Husband was super excited that this grill gazebo came with the ability to have power, so he happily installed the PowerPort™ onto the back left post that features 3 electrical outlets and 3 USB ports, allowing him to install lights on the roof, a fan, charge his phone while grilling and plugging in one of his handmade bluetooth speakers (we always have one outside with us).
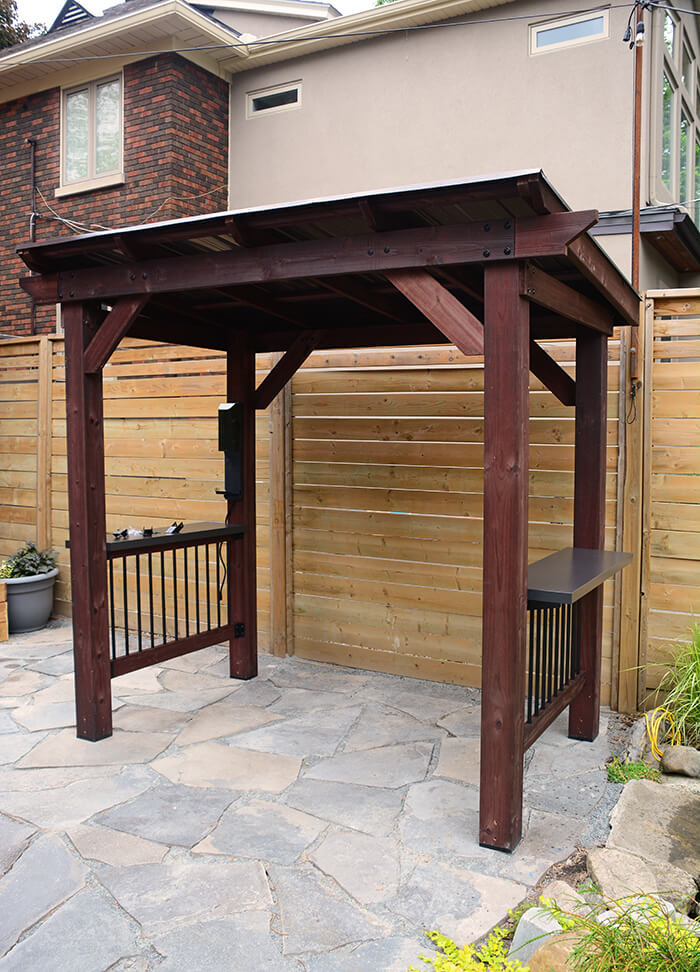
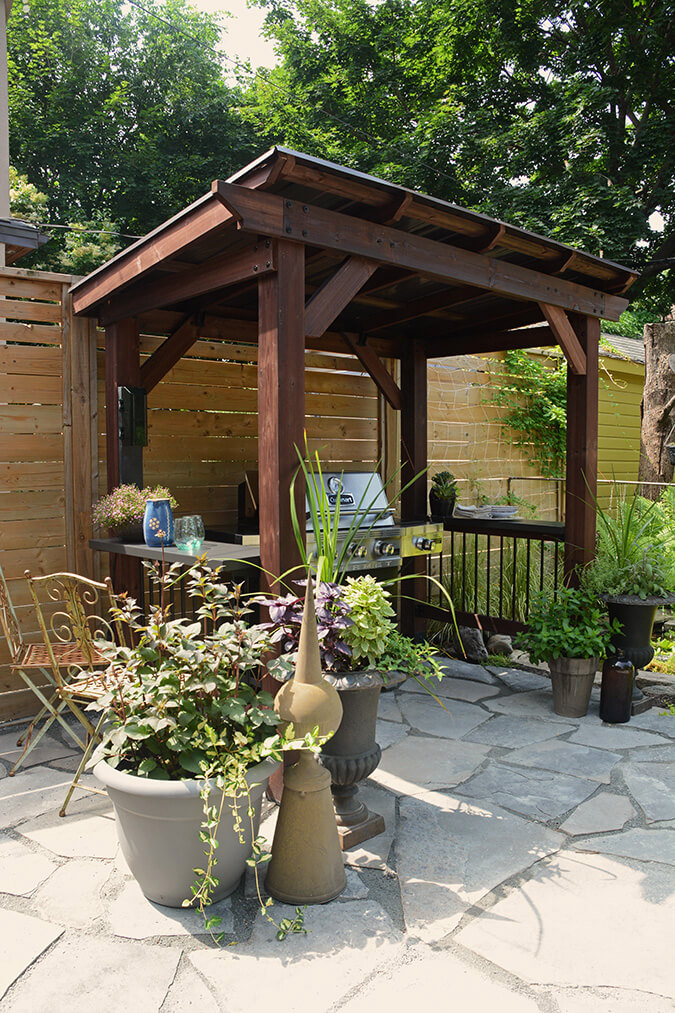
And there you have it, all done! We were sooooo happy with how this grill gazebo turned out. My husband stared out the back door for days in awe. We have a little bit of work still to do around that area but with some potted plants around the new gazebo, it really is looking fabulous already and we have been barbequing non-stop since we put it together. Before I share some photos of it looking cute and ready for some grilling, the kind folks @ Backyard Discovery are offering 15% off with the code DESIRETOINSPIRE15 on the Canadian site valid until July 15th. I could not recommend their products more – this was such a blessing and we honestly could not be more pleased with how it looks and functions.
My new modular sofa from Expand Furniture
Posted on Tue, 11 Apr 2023 by KiM
The lovely folks of Expand Furniture reached out to me recently about their products and I have to say after all of these years of blogging not much surprises me anymore…but this company sure did. As their name may suggest, their specialty is space saving, multi-functional furniture, and creating space in your home that you did not know you had. And they have such unique ways of saving space that my mind is literally blown. I could not get over the options they offer. How about the Wall bed Revolving Bookcase Table – a bookcase that hides a dining table and revolves to uncover a murphy bed! WHAT?!?! A mirror that stores your dining table extensions! A bunkbed couch transformer! A sofa bookcase murphy bed combo! A wall desk that converts into bunk beds! An ottoman that stashes away stools! One that I think is super-handy in this era of working from home is the coffee table that converts into a desk so you can work from the sofa. I could go on and on they have so many unique options. It’s really incredible what they have come up with and the multi-functional needs they service. Such amazing small space furniture options.
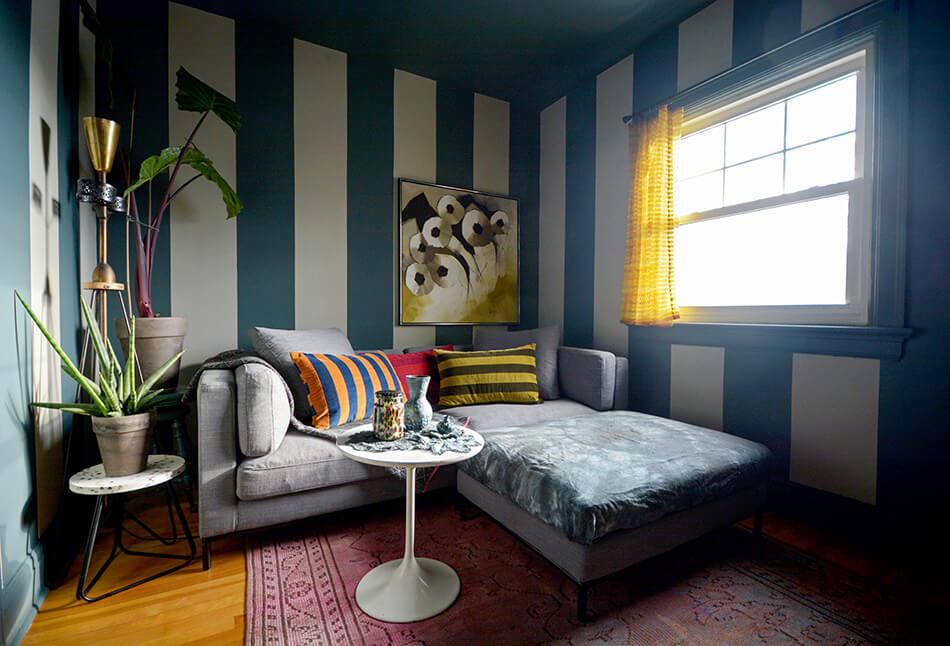
With just my husband and I in a reasonable sized 4 bedroom house and with a staircase with a 180 degree corner that makes bulky/long items near impossible to get up the stairs, I opted to go simple and try out one of Expand Furniture’s modular sofas. I chose the Migliore modular love seat with an ottoman for our tiny media room that we have created out of one of our spare bedrooms.
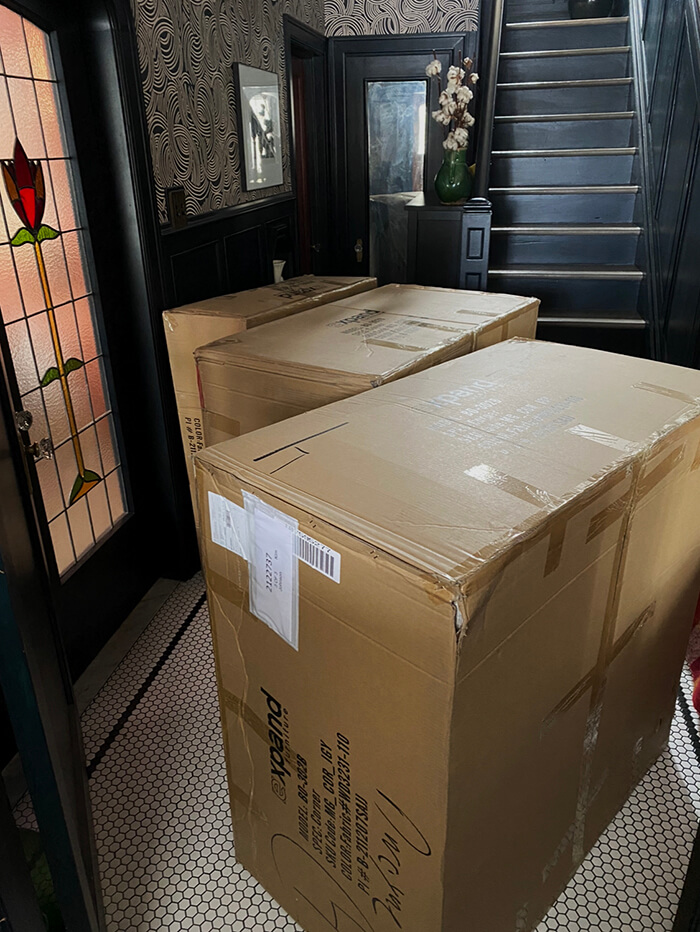
When they arrived I got a little nervous about the size of the boxes but fear not! Everything made it up the stairs easily. This was one of the most exciting unboxings I’ve done in a long time 🙂
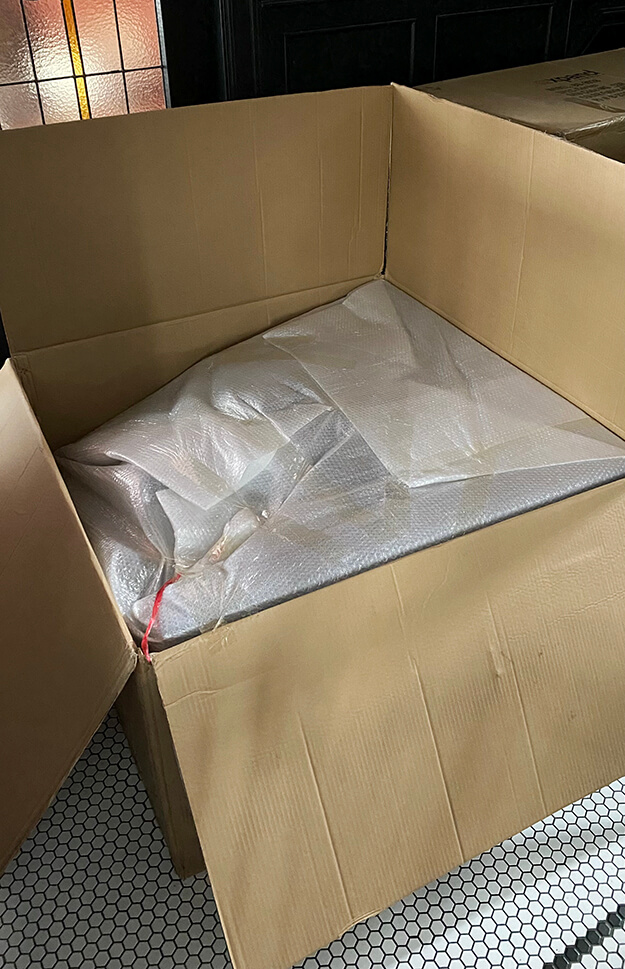
I also need to commend them on great packaging. Thick boxes (that I of course recycled), then tightly wrapped in bubble wrap with the sharp leg edges covered in fabric and taped up (the legs were removed and packaged up in bundles).
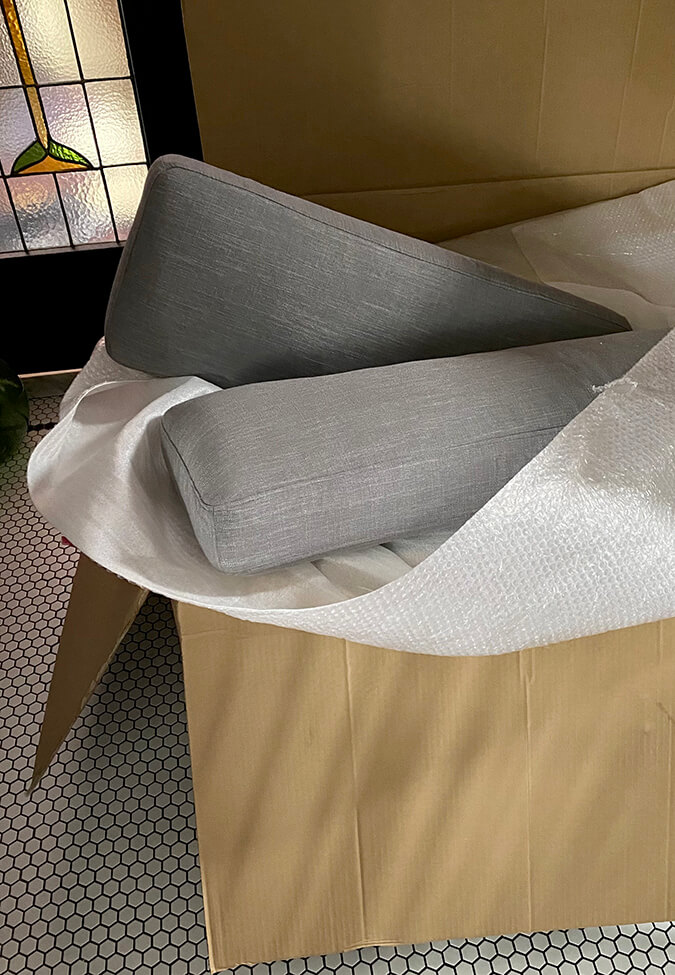
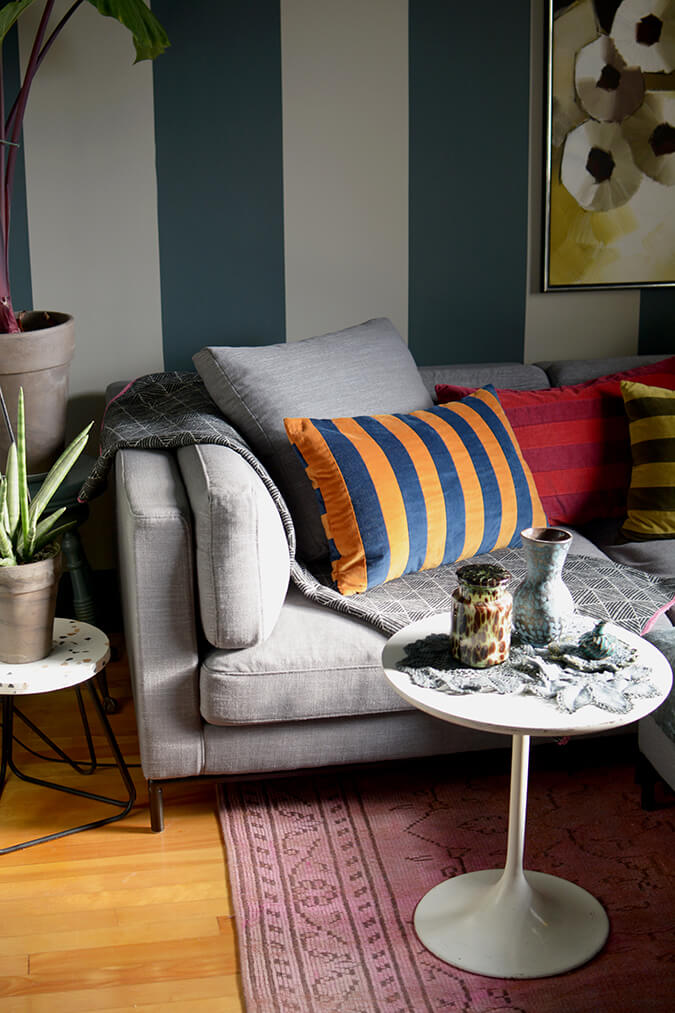
With a house filled with cats I was ecstatic over this grey fabric I chose. It’s really thick and durable and a gorgeous shade of grey. The weight of the cushions are substantial and they’re memory foam topped with goose feathers. It is so freaking comfortable that even my husband has been commenting how much he loves it. And I love knowing that in the future if we move it to the much bigger living room we can purchase additional pieces from this line to suit the space. It’s a winner!
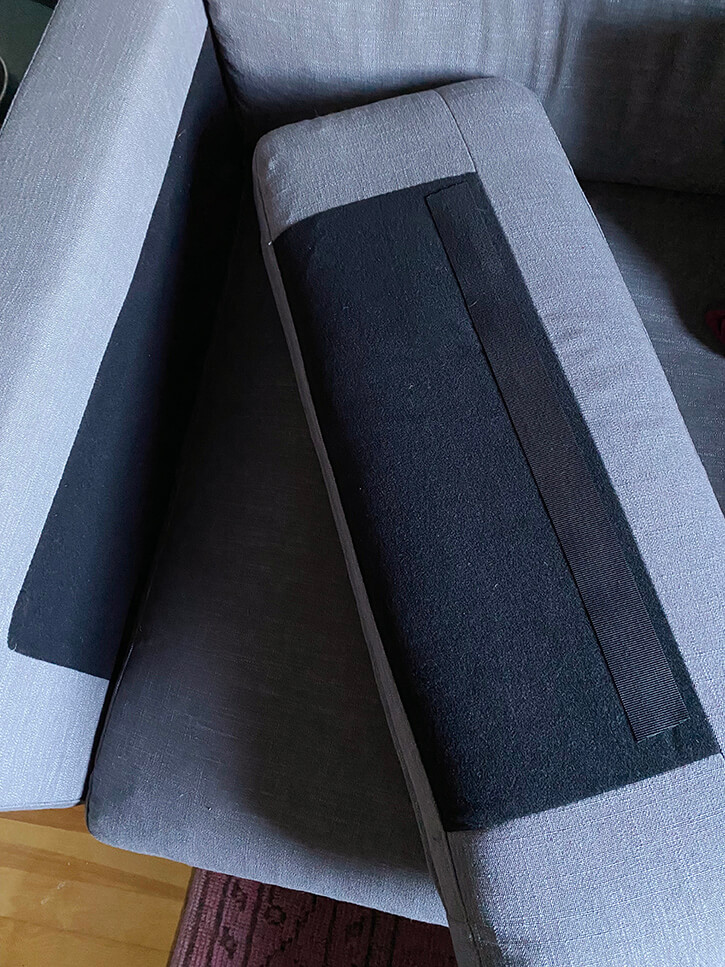
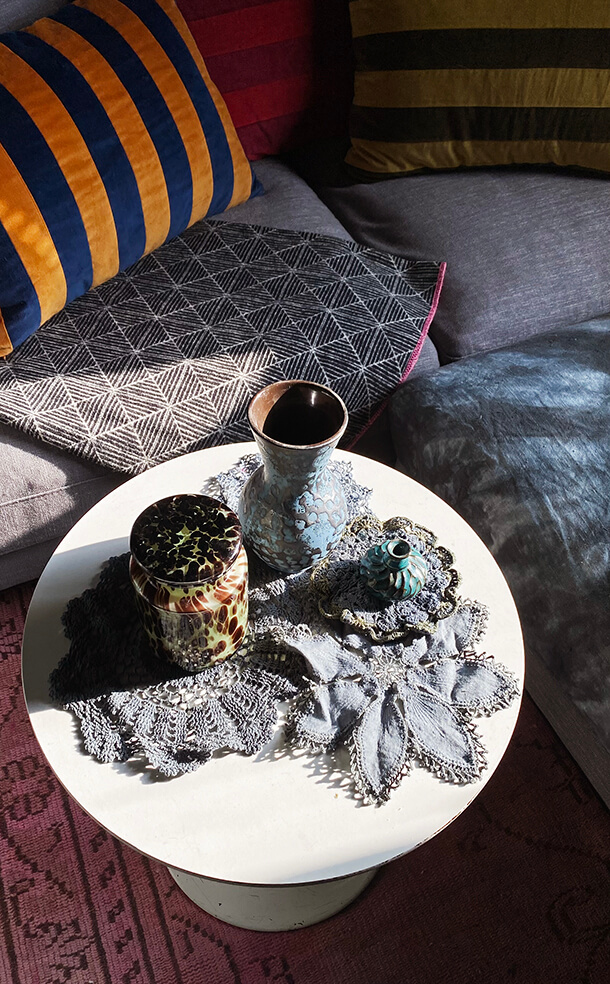
I love that for each major cushion there’s velcro and a sort of microfibre panel so you can put each cushion exactly where you want them and nothing slides around.
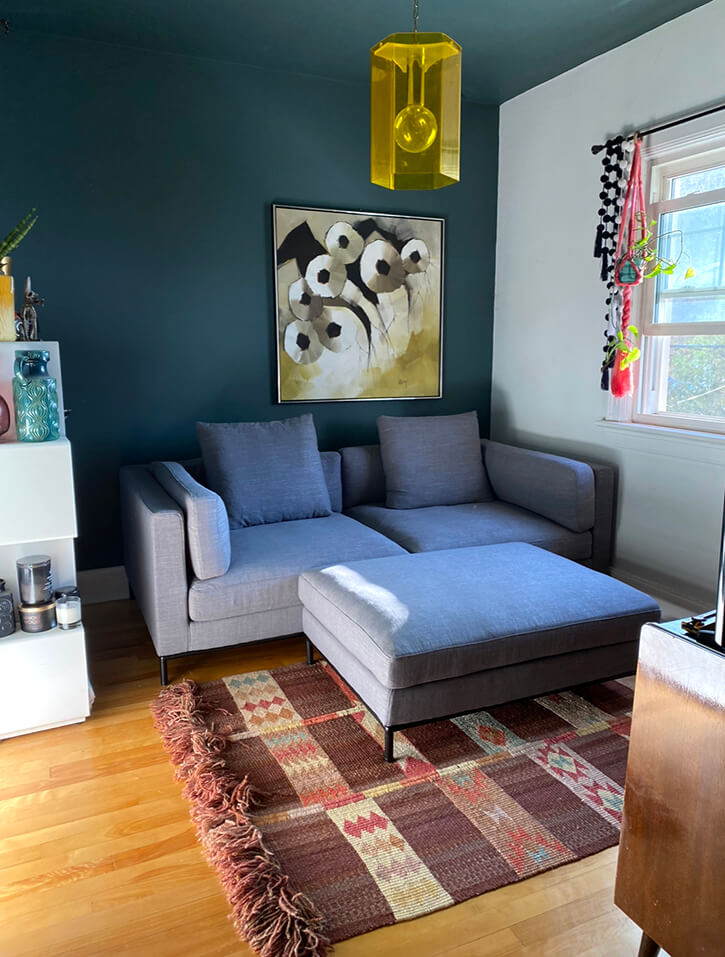
I took out the old sofa, put in the new, and tried it out for a week or so and fell in love with it. But the room needing a makeover. The blue and white walls weren’t living up to the expectations the new sofa now set. So I went to work on a little project.
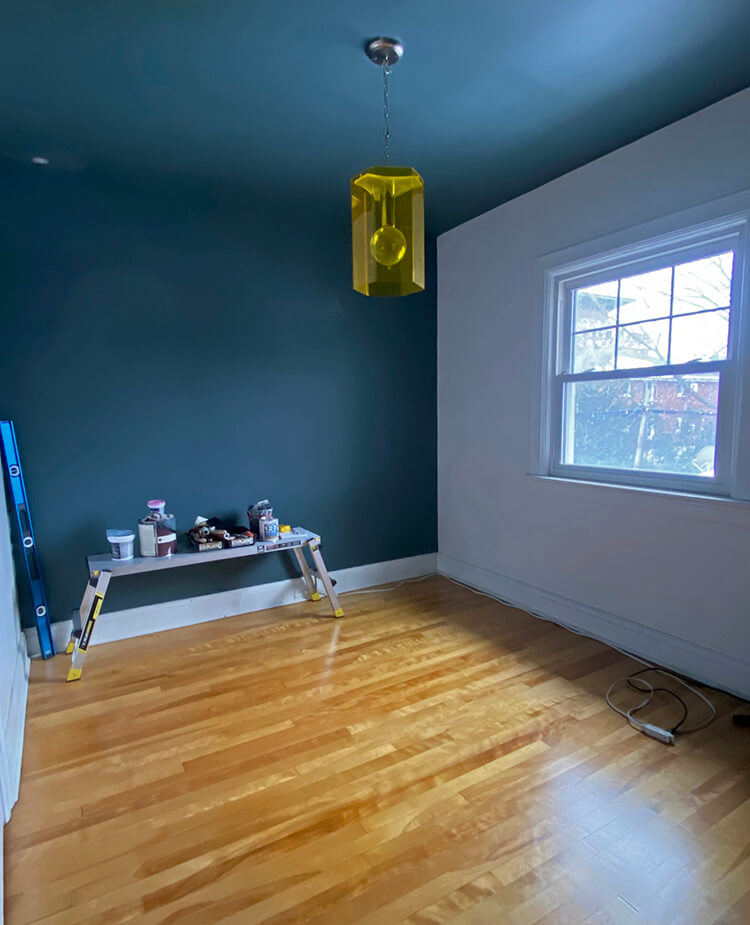
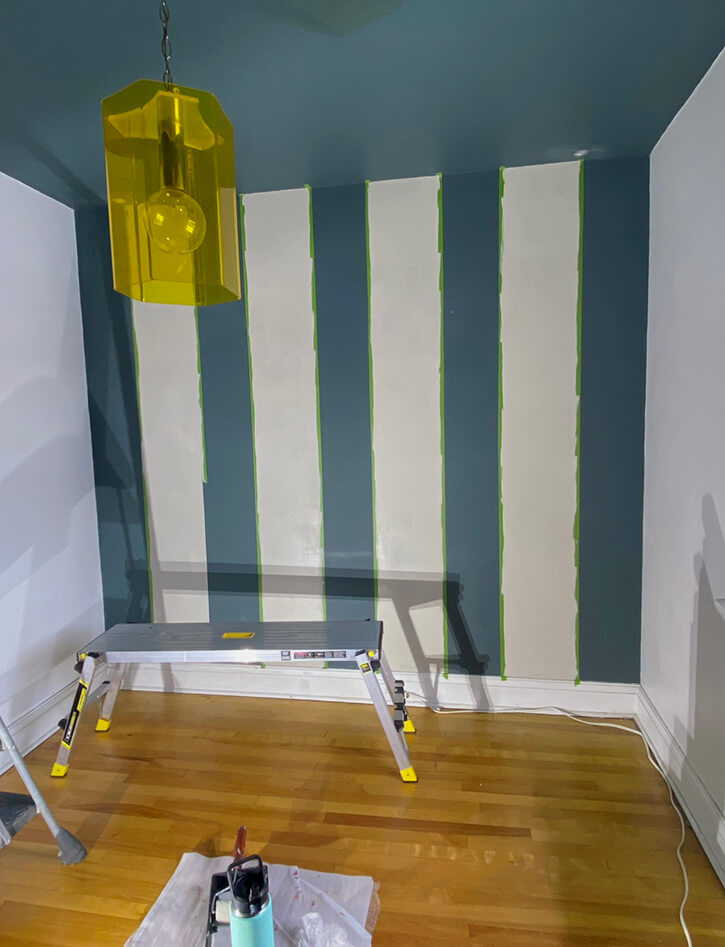
The Farrow & Ball Inchyra Blue is such a unique colour and I really love it so I decided to wrap the room in stripes in that colour as well as Drop Cloth. And despite it being a pain in the butt and time consuming I love how it turned out and I could not love the room more. It really makes the new sofa pop.